

Ever wondered how you can easily add a nutritious punch to your meals? Picture this: you’re in your kitchen, craving fresh greens, but don’t have a garden. What if you could grow your own superfood in a simple jar, right on your countertop? In this article, you’ll discover the simple yet rewarding process of growing broccoli sprouts in a jar.
Imagine having a jar filled with vibrant, homegrown broccoli sprouts ready to enhance your salads, sandwiches, and smoothies. Not only are these tiny greens packed with nutrients, but they also add a delightful crunch and flavor to your dishes. With just a few steps, you can elevate your culinary experience and boost your health effortlessly.
Get ready to embark on a journey of growing your own superfood oasis in a jar. By the end of this article, you’ll be equipped with the knowledge and confidence to cultivate fresh broccoli sprouts at home, bringing a burst of freshness and nutrition to your daily meals.
Selecting High-Quality Broccoli Seeds
When it comes to Selecting High-Quality Broccoli Seeds for sprouting, you want to ensure you’re starting with the best foundation for your broccoli sprout journey. Here’s what you need to keep in mind:
- Choose organic seeds: Opt for organic broccoli seeds to avoid any exposure to harmful chemicals or pesticides. This helps in ensuring that you’re growing sprouts that are not only nutritious but also free from any unwanted additives.
- Look for reputable sources: Purchase your broccoli seeds from reputable suppliers known for their quality products. This can increase the likelihood of successful sprouting and give you peace of mind about the origin of your seeds.
- Check the freshness: Freshness is key when it comes to seeds. Make sure to check the expiry date on the seed packet and aim for seeds that are recently harvested to improve germination rates.
- Consider varieties: There are different types of broccoli seeds available, each with its unique flavor profile and nutritional benefits. Research the varieties available and choose one that suits your taste preferences and nutritional requirements.
- Read reviews: Before making a purchase, read reviews from other sprout growers to get insights into the quality of the seeds and their sprouting success. This can help you make an informed decision and increase the chances of a successful harvest.
Remember, the quality of your broccoli seeds sets the foundation for the entire sprouting process. By choosing high-quality seeds, you’re one step closer to enjoying fresh and nutritious broccoli sprouts in your meals.
Preparing the Jar for Sprouting
To get started with growing broccoli sprouts in a jar, you’ll first need to prepare your sprouting jar properly.
- Select a Wide-Mouth Mason Jar: Opt for a quart-sized jar with a wide mouth for easy rinsing and draining.
- Gather Your Materials: You’ll need the jar, a mesh lid or cheesecloth, broccoli sprouting seeds, and water.
- Clean and Sanitize: Ensure your jar is clean by washing it thoroughly with soap and water.
- Attach the Mesh Lid: Secure the mesh lid or cheesecloth on the mouth of the jar using a rubber band or the metal ring of the jar lid.
- Measure the Seeds: Add about 1 to 2 tablespoons of broccoli sprouting seeds to the jar.
- Rinse and Drain: Rinse the seeds with water, then drain well. Fill the jar with water, cover with the mesh lid, and let the seeds soak for about 8-12 hours.
- Drain Excess Water: After soaking, drain the water from the jar by turning it upside down at an angle to allow for proper drainage.
- Place the Jar Upside Down: Store the jar upside down at an angle in a bowl or dish to continue draining and allow airflow.
Properly preparing your jar sets the foundation for successful broccoli sprout growth. It’s a crucial step in ensuring your sprouts develop well and stay fresh.
Recommended Products

All-in-One Convenient Design: The sprouting jar lid's innovative two-in-one structure allows it to double as a sturdy stand—no extra parts needed. This integrated sprouting lid fits securely on 3.74-inch wide-mouth Mason jars, guaranteeing leak-free sprouting
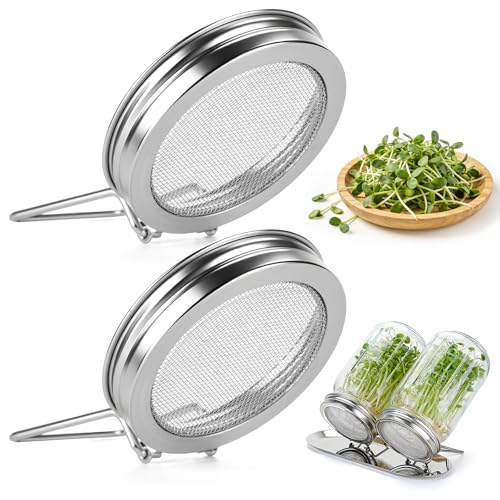
2-in-1 Sprouting Kit: The all-in-one sprouting lid features a built-in stand that allows the jar to be tilted for hands-free draining, improves airflow, and makes rinsing easier—no additional rack required. No tray and jars included

2 PACK — SPROUTING LIDS ONLY: Package includes 2 sprouting lids only. This is not a complete sprouting jar kit, sprouts growing kit or sprouting kit. Mason jars, seeds, trays, baskets and other accessories are not included.
Soaking and Rinsing the Broccoli Seeds
When it comes to soaking and rinsing your broccoli seeds, it’s crucial to follow the right steps for successful sprouting:
- Measure out the broccoli seeds carefully to ensure the right balance for sprouting.
- Place them in the jar and cover them with filtered water.
- Let the seeds soak for 8-12 hours, ensuring they are fully submerged.
- After soaking, rinse the seeds thoroughly under cool, running water.
- Drain the excess water from the jar by turning it at an angle.
Sprouting and Growing Process
Growing broccoli sprouts in a jar is an exciting and rewarding experience. Here are some key steps to guide you through the sprouting and growing process:
- Rinse and Drain: After soaking the seeds, rinse them under cool water thoroughly. Drain excess water by tilting the jar and allowing it to stand at an angle to ensure proper ventilation.
- Repeat Rinsing: Rinse the seeds at least twice a day to prevent mold growth. Ensure the sprouts are kept moist but not waterlogged.
- Provide Adequate Airflow: For healthy growth, make sure the sprouts have access to fresh air. Set the jar in a well-ventilated area, away from direct sunlight.
- Monitor Germination: Keep an eye on the sprouts as they grow. You’ll start to see tiny broccoli sprouts within a few days.
- Harvesting: Once the sprouts reach your desired size, usually around 5-7 days, it’s time to harvest. Rinse them well and enjoy the fresh and nutritious broccoli sprouts in your favorite dishes.
| Key Point | Data |
|---|---|
| Optimal growth | 5-7 days |
| Rinsing frequency | Twice a day |
Recommended Products

✔️ WHOLESOME INEXPENSIVE FOOD AT HOME - Everything you need to grow and harvest your own delicious sprouts and microgreens in the convenience of your home.

COMPLETE SPROUTER SET - Just add your own seeds to grow fresh & delicious sprouts at home. Includes 2 glass jars, 2 sprouting lids, stainless steel stand, drip tray, 2 blackout sleeves

Foldable stander, heavy duty, For 32 Oz Mason Jar seed sprouting lid stand or iPad and Phone.
Harvesting and Storing Your Broccoli Sprouts
When it’s time to harvest your broccoli sprouts, here are a few key steps to follow:
- Harvest: Clip the sprouts right above the seed hulls when they reach around 1-2 inches in length.
- Storage: Store your harvested sprouts in a clean container lined with a paper towel to absorb any excess moisture.
- Refrigeration: Keep your broccoli sprouts in the refrigerator to maintain freshness.
Enjoy your fresh and nutritious broccoli sprouts in salads, sandwiches, smoothies, or as a topping for various dishes.
Conclusion
You’ve now mastered the art of growing broccoli sprouts in a jar! Remember to keep up with the rinsing, draining, and airflow to ensure healthy sprout growth. Monitoring germination and harvesting at the right time are key steps in this process. By clipping the sprouts above the seed hulls and storing them properly, you can enjoy these nutritious additions to your meals. Experiment with adding broccoli sprouts to salads, sandwiches, and smoothies for a fresh and tasty boost of flavor. Happy sprouting!
Frequently Asked Questions
1. Why is rinsing important in the broccoli seed sprouting process?
Rinsing helps to maintain the moisture levels necessary for germination and growth of the broccoli seeds. It also aids in washing away any residue or potential contaminants that may hinder the sprouting process.
2. Why is it essential to drain the broccoli seeds properly?
Proper draining ensures that excess water is removed, preventing the seeds from sitting in stagnant water, which can lead to mold and spoilage.
3. How does providing airflow contribute to the sprouting process?
Airflow helps to prevent the build-up of excess moisture, allowing the sprouts to breathe and reducing the risk of mold development during the germination phase.
4. Why is it important to monitor the germination process closely?
Monitoring helps you track the progress of the sprouts, ensuring they are growing healthily and identifying any issues early on to take corrective action.
5. When should the broccoli sprouts be harvested?
Harvest the broccoli sprouts when they reach 1-2 inches in length, typically within 5-7 days of germination, for the best taste and nutritional value.
6. How should the harvested broccoli sprouts be stored?
Store the harvested sprouts in a container lined with a paper towel in the refrigerator to maintain freshness and prevent spoilage.
7. How can broccoli sprouts be incorporated into dishes?
Broccoli sprouts can be enjoyed in a variety of dishes like salads, sandwiches, and smoothies, adding a nutritious and fresh crunch to your meals.
