


I often see flower beds end up looking uneven when the first layout skips any real plan for how wide each plant will eventually grow. Working out the spacing with stakes or a quick sketch first lets me shift things around so roots have room without constant fixes later on. In my own yard I would mark out a few staggered rows before planting anything permanent to see how the bed looks from the main path. These small layout tweaks also make watering and weeding simpler since nothing gets buried or stepped on once growth starts. The whole area just settles into place after a season.
Define Flower Beds With Simple Edging

Adding a clean edge is one of the quickest ways to fix a flower bed that looks messy and unplanned. The before version had plants spilling out in every direction with no real border holding them in place. Once the edging went in, the bed gained a clear shape that made the plant spacing feel deliberate instead of random.
This approach works especially well along sidewalks or in front of the house where the bed needs to look tidy from the street. Start by removing the old growth and weeds, then choose edging that sits low enough to mow around. After the border is set, arrange the plants in layers so nothing crowds its neighbor and each one has space to fill in over time.
Add Raised Beds To Structure A Backyard Garden

An empty patch of soil often looks unfinished because there is no clear edge or plan. Installing raised beds gives the space shape right away. The before photo shows loose black edging and scattered plants along the fence. The after shows several wooden beds set on gravel, each one holding its own group of flowers with room to grow.
This approach works best in small yards or along property lines where you want to keep different plants from mixing together. Measure your space first and lay out the beds so you can still walk between them. Gravel under and around the frames keeps the ground clean and stops weeds from creeping in.
Define Garden Beds To Organize Overgrown Planting

One simple way to fix a messy planting area is to give it clear borders first. The before photo shows plants growing in every direction with no real shape, but adding stone edging and a layer of mulch made the bed look intentional and much easier to care for.
This idea works best in front yards where the garden sits right in the lawn. Keep the edging low so it does not fight the grass, group similar plants together, and leave space between groups so nothing gets crowded as it fills in.
Add Structure To An Overgrown Flower Bed
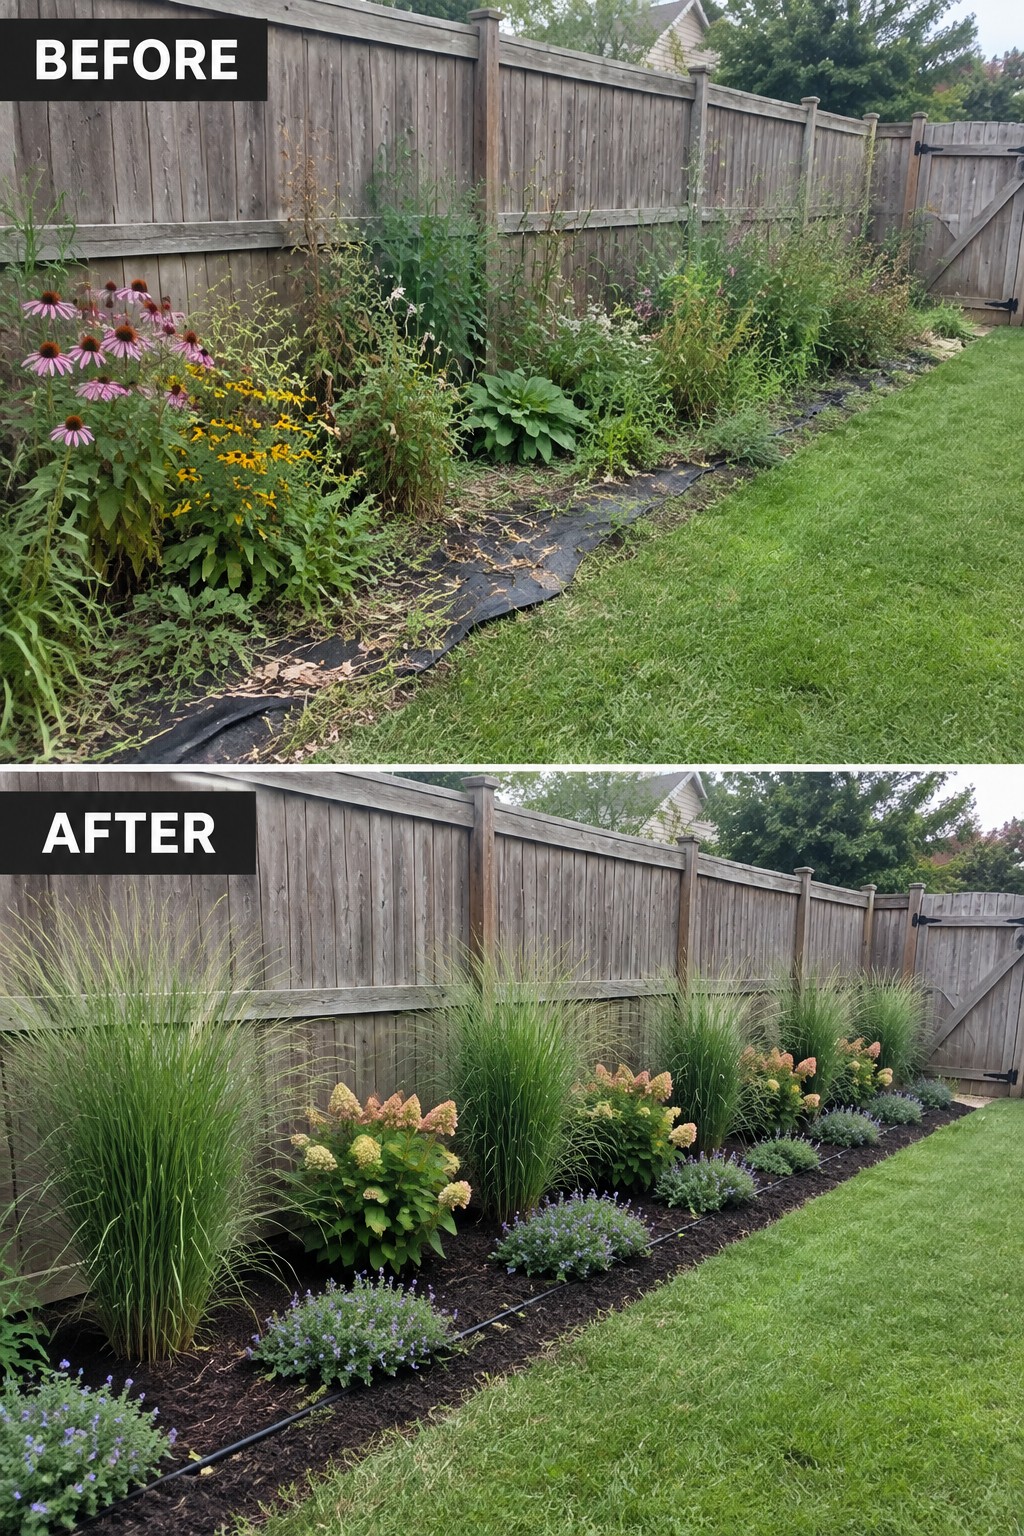
A messy border often starts with good intentions but ends up with plants fighting for space and weeds filling the gaps. Clearing everything out first, then replanting in simple layers, makes the same strip along the fence look intentional and easier to maintain. The change from tangled growth to neat rows of tall grasses, rounded shrubs, and low ground covers shows how spacing and height differences keep each plant visible.
This layout works best on long, narrow beds where you need order without crowding. Group taller plants toward the back, mid-size ones in the middle, and shorter ones along the front edge. Mulch the soil once everything is in and leave room for each plant to reach its full width.
Define A Flower Bed Around A Tree With Edging

Many yards have a big tree near the house where the ground just looks messy. Adding a simple metal edging ring creates a clear boundary that turns the spot into an actual planting area instead of scattered mulch and random plants. Once the shape is set, you can fill it with layers of hostas, ferns, and lower flowering plants so everything has room without crowding.
This approach works well in front yards where trees sit close to the lawn. Start by cleaning up the area and installing the edging before you buy plants. It keeps the bed from spilling into the grass and makes it easier to water and maintain the different heights without everything running together.
Layer Plants To Fill A Flower Border

A long border looks thin when plants sit too far apart and weeds fill the gaps. The change here comes from clearing the bed first, then adding a mix of heights and spreads so the flowers grow into each other instead of leaving open mulch.
This approach works best along a house wall or walkway where you want the planting to feel full without crowding the path. Choose a few taller stems for the back, mid-height blooms in the middle, and shorter plants along the front edge. The same spacing idea applies to any narrow bed that needs more color without adding new edging or hardscape.
Turn A Steep Slope Into Terraced Garden Beds
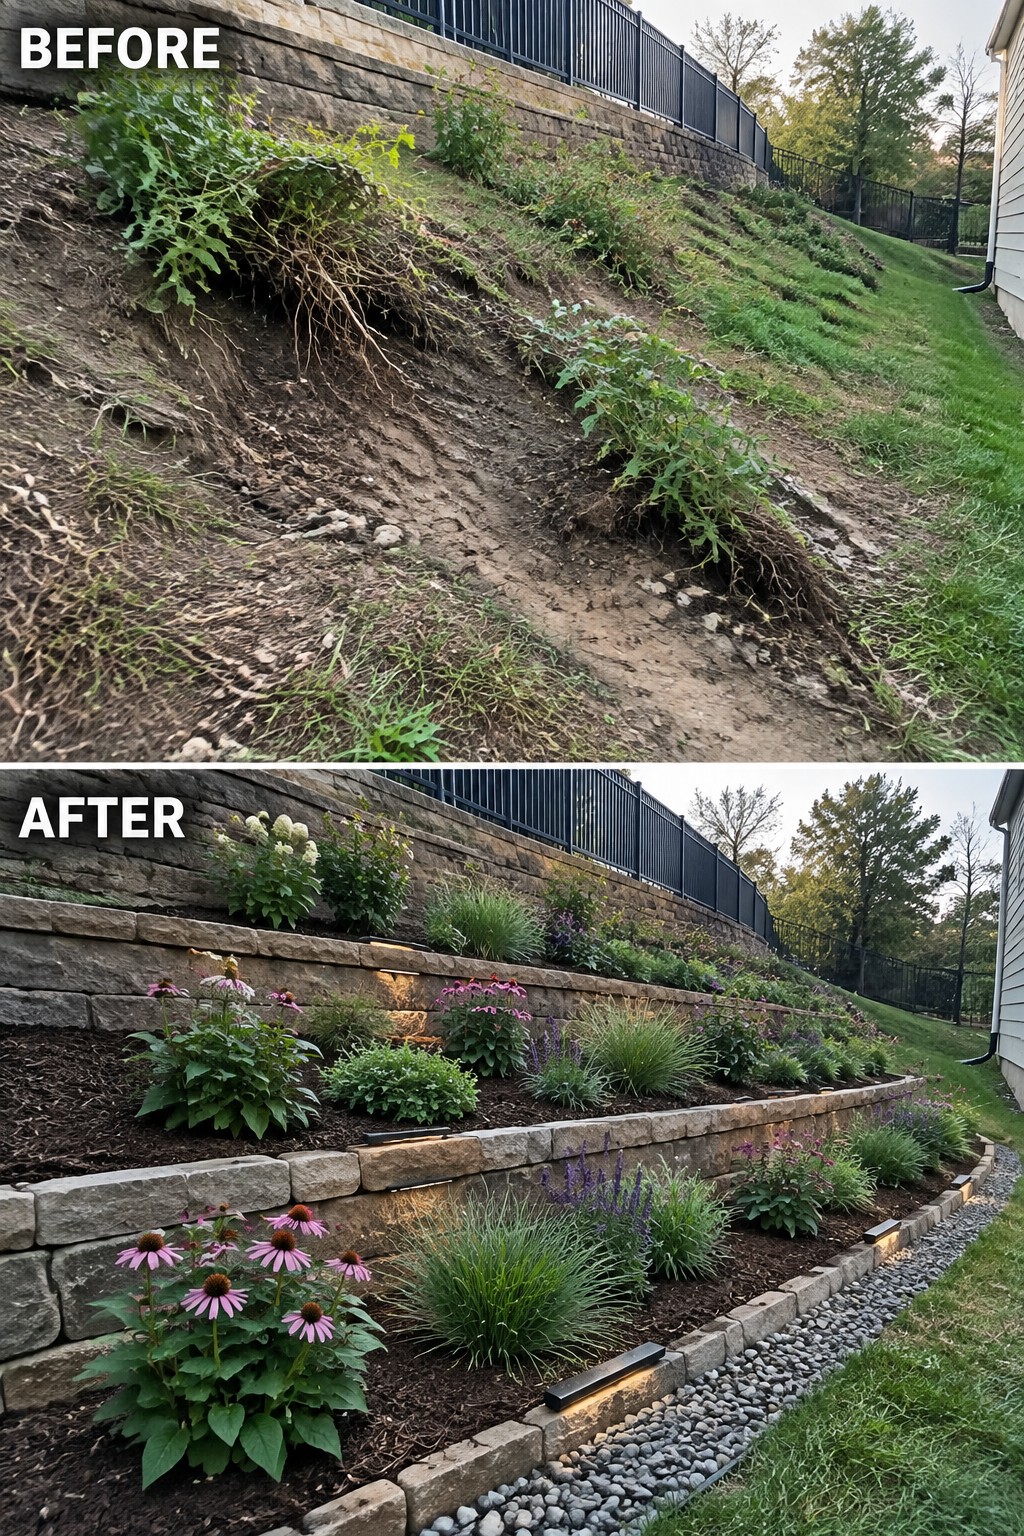
A bare slope tends to wash out and collect weeds because there is nothing to hold the soil in place. Low retaining walls fix that by creating flat planting zones that keep everything stable and give the plants room to grow without sliding downhill.
This works on any yard with a noticeable drop where you want more than just grass. Build the walls first to set the levels, add soil and mulch to each bed, then choose plants that match the light. The result feels planned instead of neglected.
Define Flower Beds With Simple Edging

The before photo shows a scattered mix of pots and plants with no clear shape along the porch. Once edging was added and the beds were shaped into clean rows, the plants gained room to breathe and the whole area looked much more intentional.
This idea works best along a house foundation or walkway where space is limited. Clear out the old growth first, then mark the beds with edging before planting. It keeps everything from spilling onto the path and makes it easier to water and weed later on.
Extend The Flower Bed Along The Fence
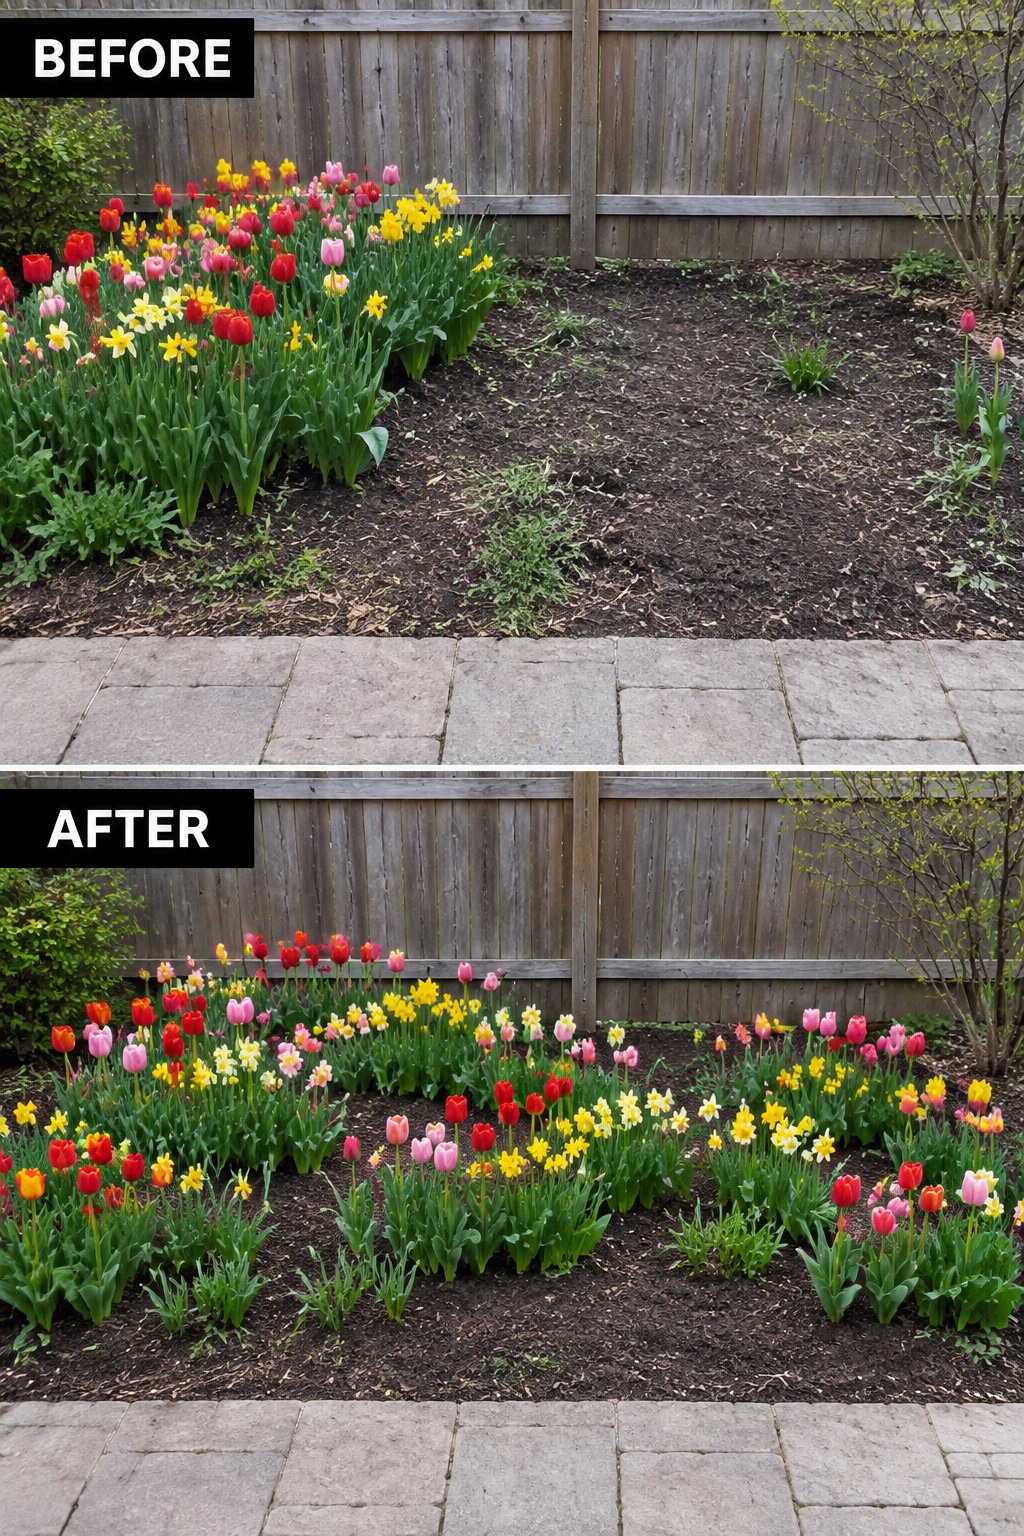
The before photo shows flowers clustered on the left with a large stretch of bare dirt along the fence. The after version extends the bed into a longer, continuous shape and spaces the plants more evenly so the whole area feels planted rather than patchy. This simple change turns an awkward gap into a proper border that looks intentional.
This approach works well in narrow side yards or along fences where you want coverage without crowding the plants. Start by outlining a wider or longer bed with a spade or edging, then fill it using the same mix of heights and colors you already have. Leave enough room between plants so they can grow in without overlapping right away.
Define Flower Beds With A Clean Edge

The biggest shift in this yard comes from giving the flower bed a clear shape instead of letting it blend into the lawn. Cutting a smooth curve and adding a dark mulch border stops the plants from spilling out and makes the whole area look planned rather than neglected.
This idea works best along the front of a house where the bed runs beside the lawn. Mark the new edge with a hose first so you can adjust the curve until it feels right, then cut it cleanly before moving plants around. It gives you a simple way to improve spacing without buying new flowers right away.
Add A Small Tree To Anchor Your Flower Bed

The before photo shows a mostly empty mulched circle with plants scattered along the edges. Adding a small tree in the center gives the whole bed a clear starting point. Once that anchor is in place, the surrounding plants can be grouped in repeating clusters instead of spreading out in a thin ring.
This layout works best in small front beds where you want structure without crowding the space. Choose a tree that stays narrow, then fill around it with mid-height flowers and lower edging plants. The center tree keeps the arrangement balanced and makes it easier to space everything else evenly.
Define Planting Beds With Gravel For Better Spacing
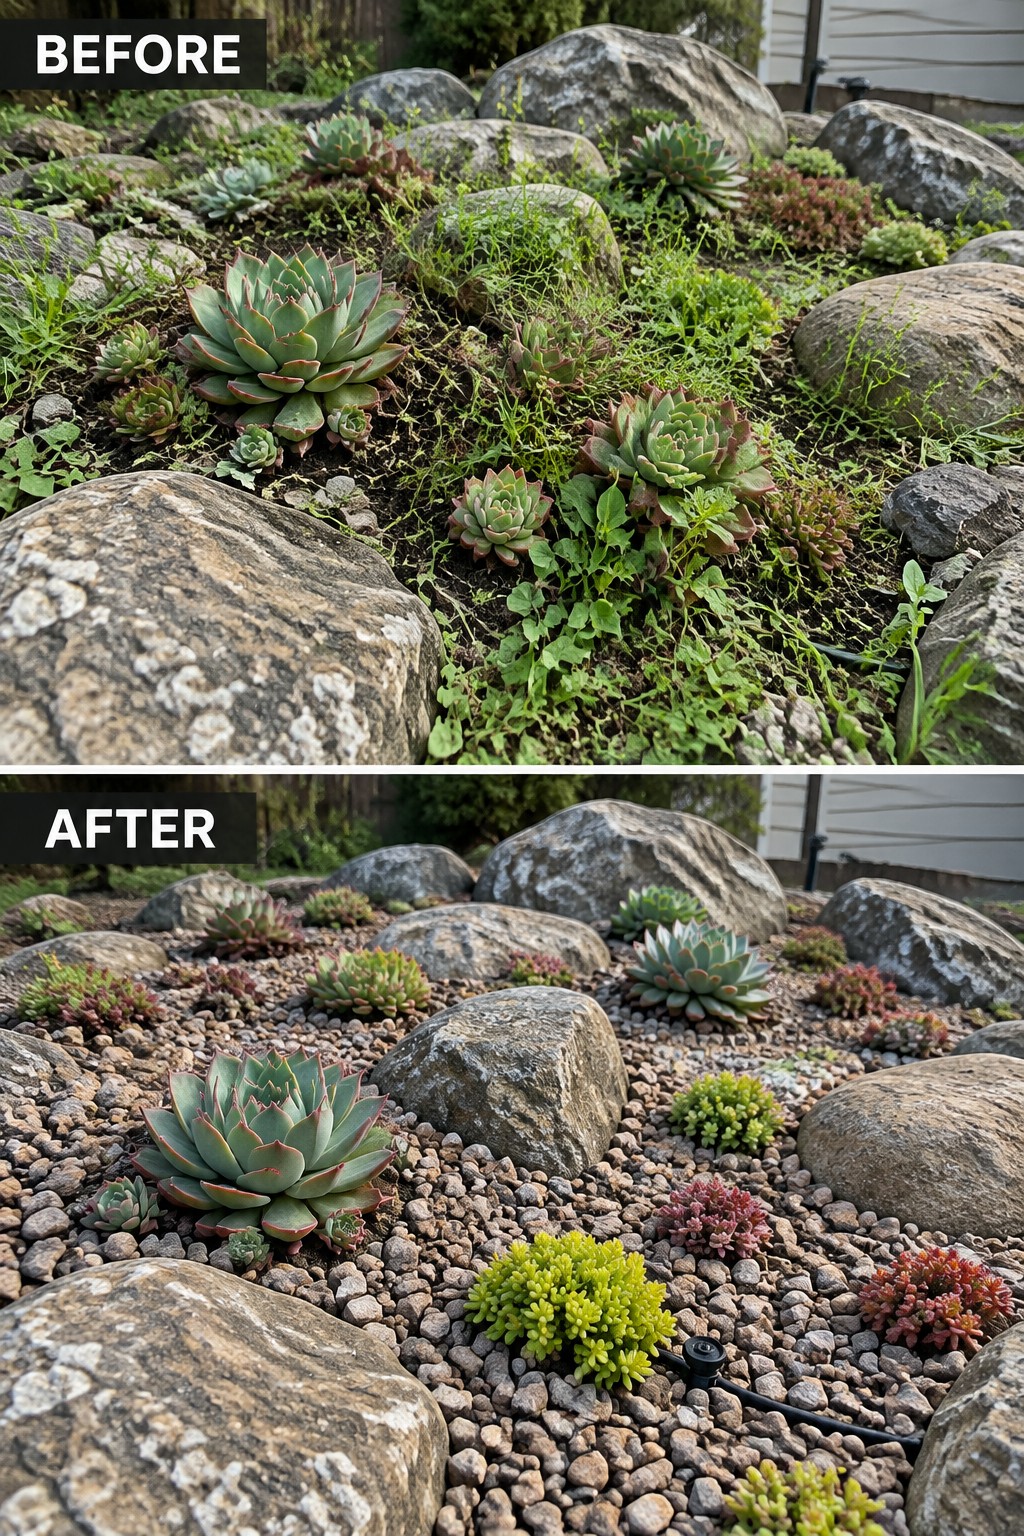
The biggest shift here comes from clearing out the weeds and loose grass first, then covering the soil with gravel. This simple step creates clear space between the rocks and gives the succulents room to show off without looking crowded or messy. The plants now sit at better distances from each other, which helps them grow and keeps the whole area looking cared for instead of neglected.
This approach works well in rocky or sloped yards where soil is hard to manage. Start by pulling the worst of the weeds, then add a layer of gravel or small stones to hold everything in place. It cuts down on future weeding and makes it easier to adjust plant spacing as things fill in. Just keep the gravel layer thin enough that water can still reach the roots.
Arrange Plants In Rows For Better Spacing

The before version had flowers growing in a tangled mix that spilled over the edges. Switching to straight rows of single colors gives each plant its own space and keeps the whole box looking full without crowding.
This layout works best in long window boxes or narrow raised beds where you want a clean pattern that lasts through the season. Pick three colors that contrast well, plant them in even bands, and leave enough room between each starter so the roots have room to spread.
Use Pavers To Create A Grid In Flower Beds

A messy strip of grass and overgrown plants along the curb can look neglected fast. Switching to a paver grid turns the same narrow space into a series of small, orderly planting pockets. The squares keep plants from spilling into each other and give the whole bed a finished edge that works right next to the sidewalk.
This layout works well in front yards or any long, thin border where you want clear spacing without adding a lot of new plants. Start by laying out the pavers on level ground, then fill each opening with soil and one or two plants. The grid keeps everything readable and makes weeding or seasonal changes much simpler later on.
Define Narrow Side Yards With Structured Planting Beds
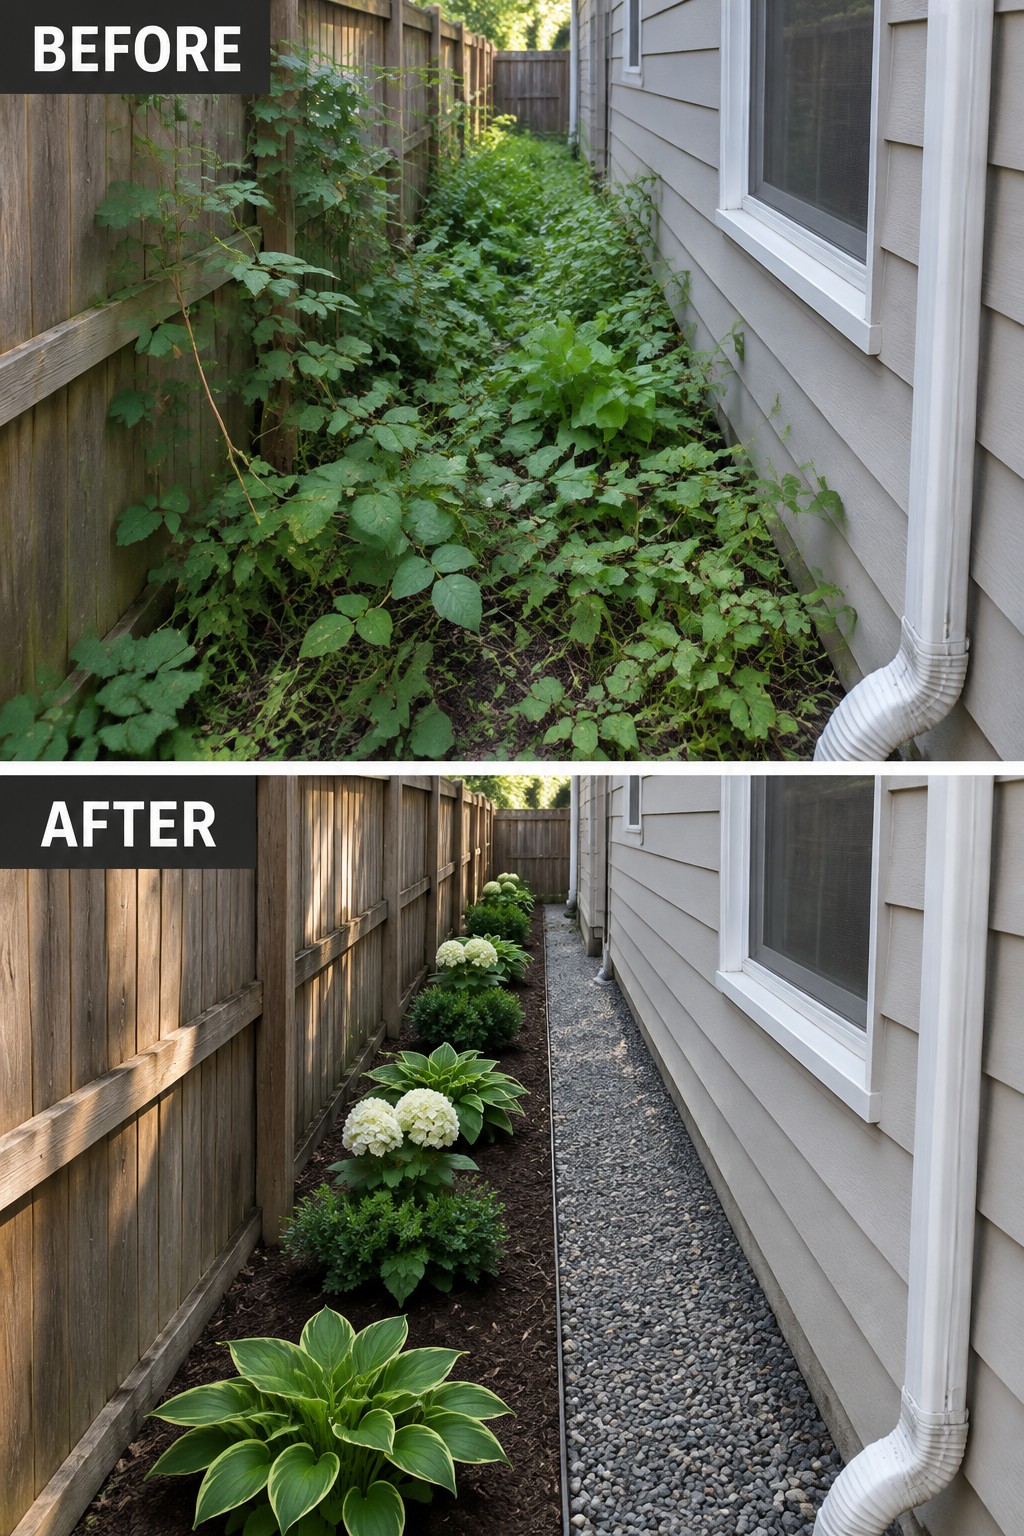
An overgrown strip between a house and fence often turns into a maintenance headache. Clearing the weeds and adding defined beds with mulch gives the space a purpose. In the after view, spaced hostas and shrubs sit in clean soil while gravel keeps the center path open and easy to walk.
This approach works well along any narrow side yard where plants tend to sprawl. Start by removing the existing growth, then mark simple bed lines that leave room for the plants to fill in without crowding. Mulch helps control weeds and makes the layout look finished even when the plants are still small.
Define Garden Beds With Gravel Edging
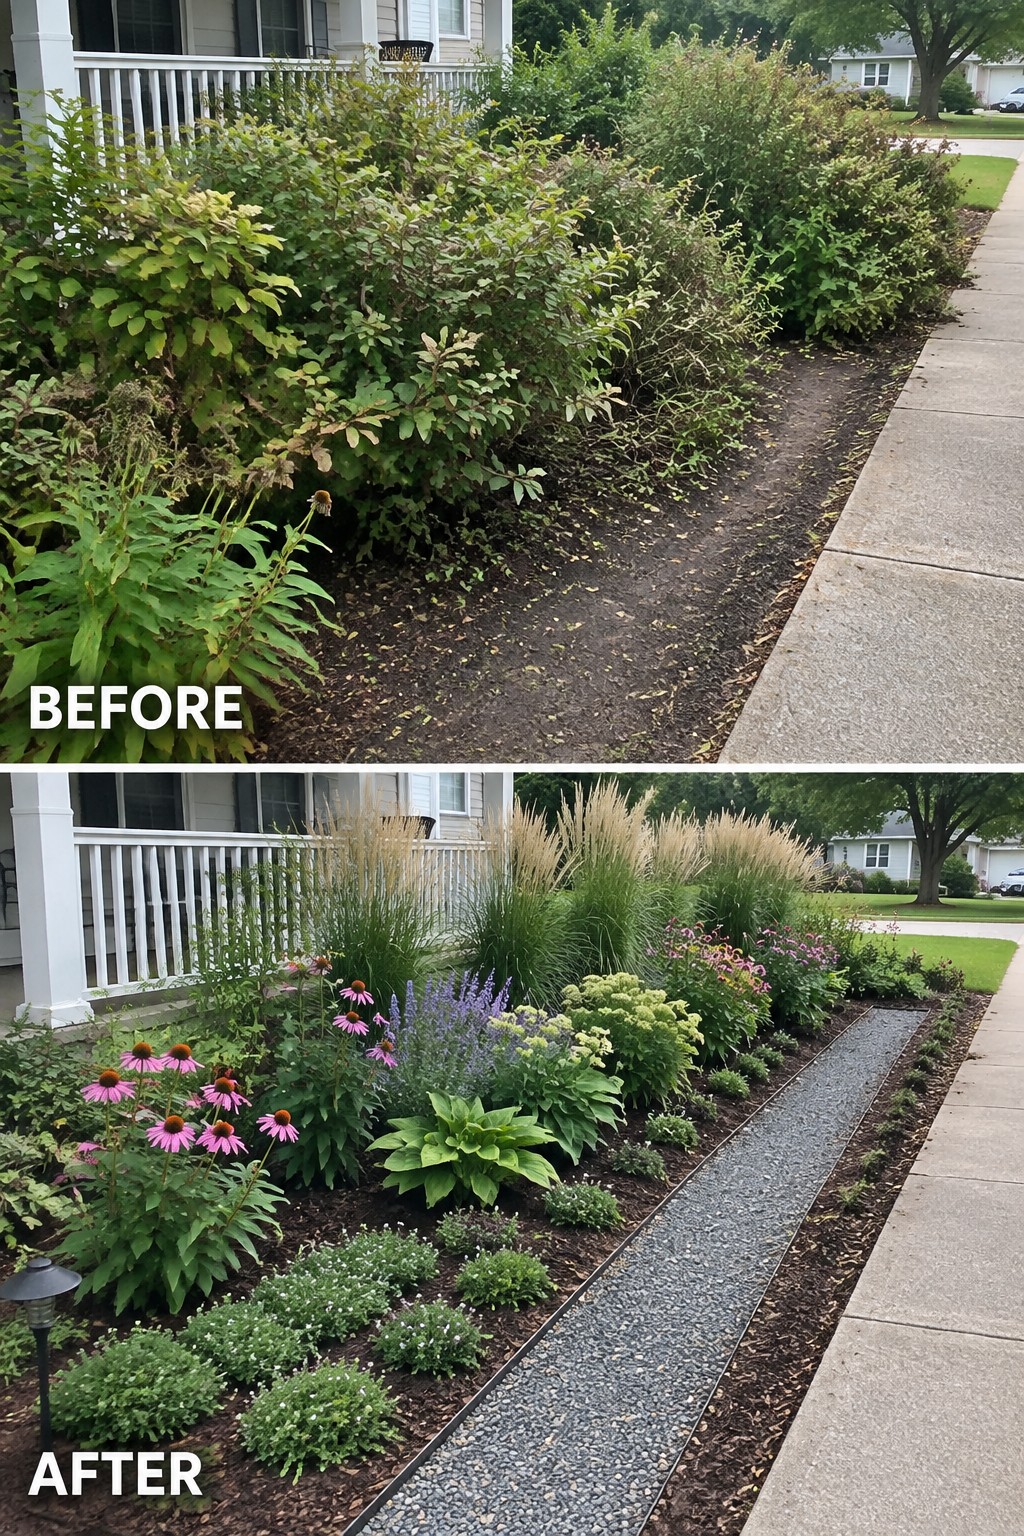
Overgrown shrubs often crowd the space right next to the house and leave the ground looking messy. Adding a simple gravel strip with metal edging gives the planting area a clear shape and keeps the walkway separate from the soil. The change turns a jumbled border into a row of beds that feel planned instead of accidental.
This approach works well along the side of a house or any narrow strip where you want plants but also need a tidy edge. Start by clearing the old growth, then lay the edging and gravel before you fill in the beds. It keeps mulch and soil from spilling onto the walk and makes future weeding easier.
Break Up A Long Hedge Into Separate Planted Beds

A single long hedge can quickly take over the front of a house and block light from the windows. Splitting that mass into smaller groups of shrubs with flowers planted along the front edge opens everything up and gives each plant enough space to stay healthy.
This approach works best along a foundation where you still want some height but need better airflow and visibility. Keep the shrubs in clusters of two or three, then add a row of lower flowers in front. The bed stays full without looking crowded, and it is much easier to maintain over time.
Define Flower Beds With Mulch And Simple Borders

An overgrown strip of weeds and wild growth can quickly turn messy along a road or sidewalk. The change here comes from clearing that area first, then grouping plants into separate beds filled with mulch and separated by gravel. This layout keeps flowers from crowding each other and makes the whole edge look planned instead of neglected.
This approach works well in front yards, along driveways, or any narrow strip where space feels limited. Clear the overgrowth, add a basic border or gravel line, and plant in clusters rather than letting everything spread. The beds stay easier to weed and water, and the plants have room to grow without taking over the whole area.
Add Structure To A Flower Bed With Planting Rings
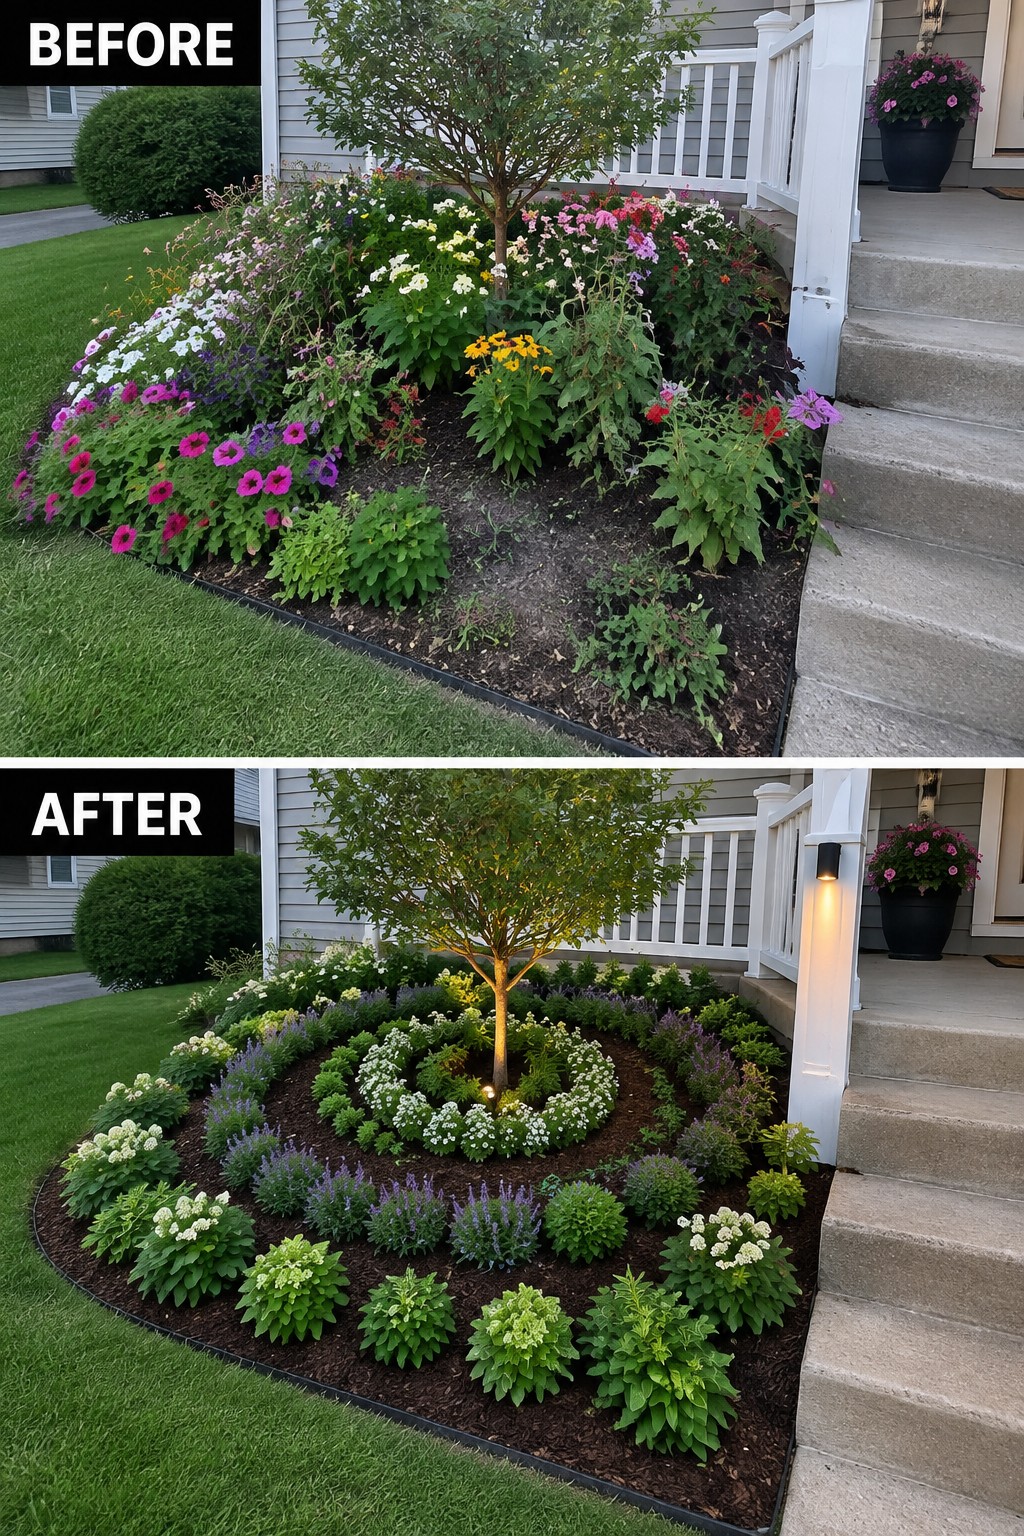
A messy flower bed often improves once you give it a clear layout instead of letting plants spread wherever they want. The before photo shows a scattered mix around the tree with no real order. The after version uses mulch and arranged rings of plants to create neat circles that keep everything spaced out and easier to manage.
This idea works best in small front beds that have a tree or focal point in the center. Start by clearing the area and adding a thick layer of mulch, then plant in layers that stay low on the outside and rise gently toward the middle. It helps the bed look planned without needing a lot of new plants.
Define A Long Border With Layered Planting
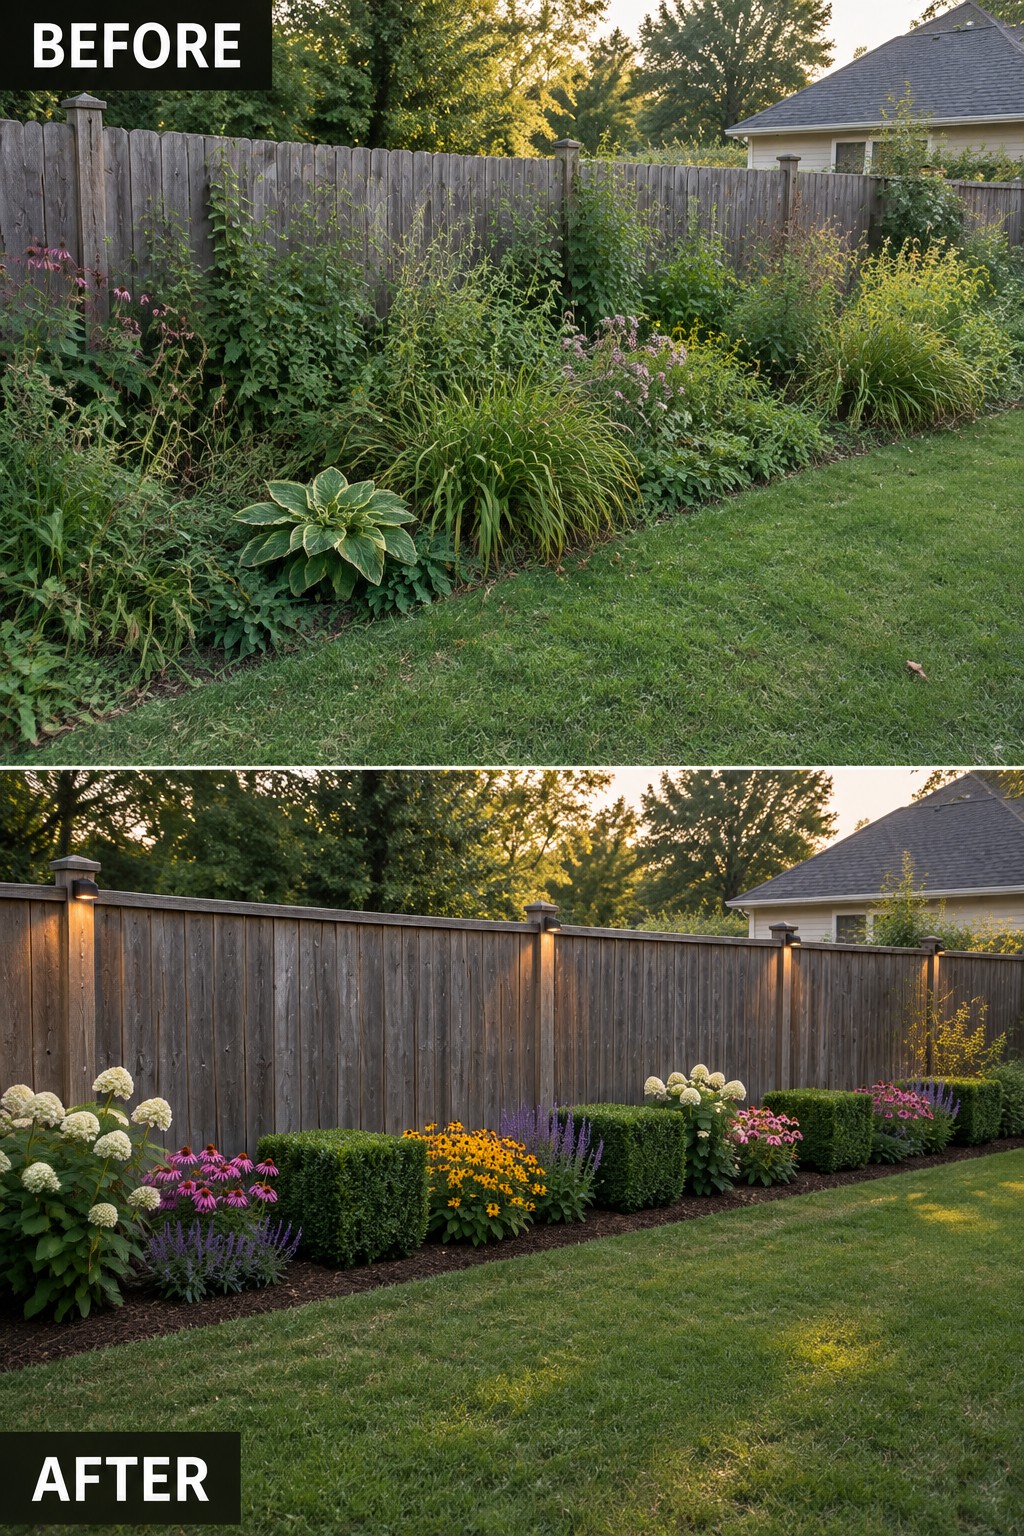
An overgrown strip along a fence often ends up with plants fighting for space and no clear layout. The fix shown here starts with clearing the mess, then setting up a simple row of low shrubs as a backbone and filling in with perennials grouped by height and bloom time. Mulch keeps the soil neat and helps the plants stay spaced out instead of crowding each other.
This approach works well on any long, narrow bed where you want order without a lot of hardscaping. Keep the tallest plants toward the back, repeat a few colors or textures, and leave enough room between groups so everything has space to fill in. The result feels planned even if the bed is fairly basic.
Frequently Asked Questions
Q: How do I measure spacing when the layout has clusters instead of straight lines? A: Place the plants first in their groups. Then step back and check that each one still has its full spread distance from neighbors.
Q: What should I do about plants that need more sun than others in the same bed? A: Group sun lovers on the south side. This way every plant gets what it needs without rearranging the whole layout.
Q: Can I reuse the same layout idea next year if some plants die? A: Pull out the dead ones and fill the spots with similar sized replacements. But test the soil first to see why they failed.
