

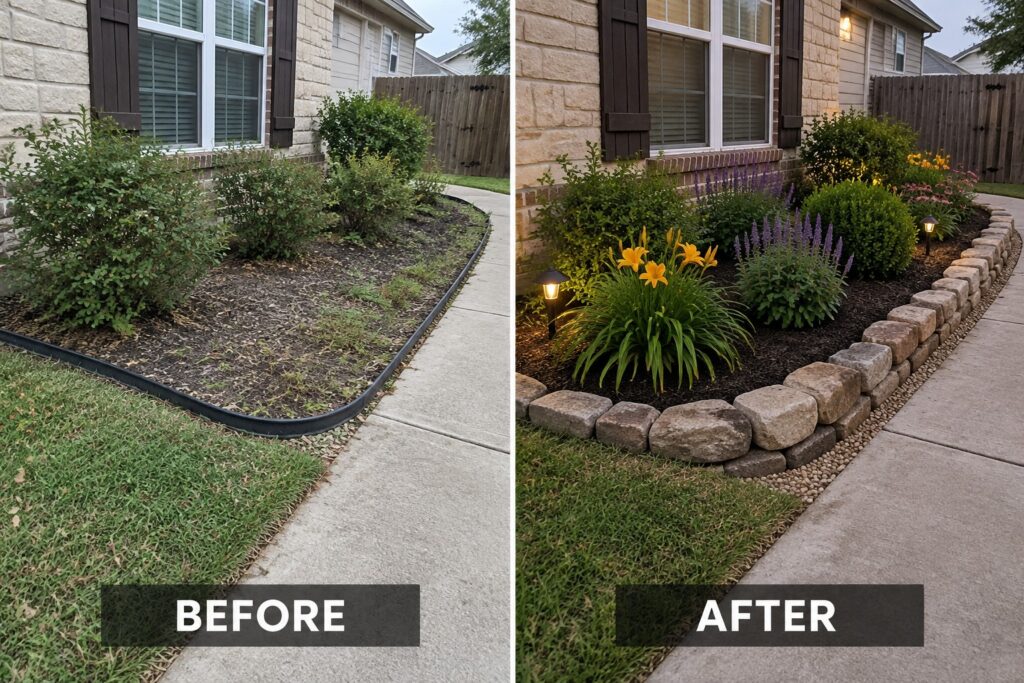
Flower beds without a solid edge tend to blur into the surrounding grass after a season or two of growth and foot traffic.
Natural stone edging brings back a clear line that makes the planting area feel intentional and easier to care for over the years.
I have seen how even a modest amount of stone can pull scattered beds into a more cohesive layout without needing new plants or major digging.
It holds up better than I expected.
Looking at different ways to lay the stones helps match the style to the rest of the yard and the materials already on hand.
Define Flower Beds With Natural Stone Edging

Natural stone edging gives a garden bed a clear shape that mulch and plants alone cannot provide. The loose edge in the first photo let the bed blend into the lawn. Adding a low stacked stone border created a firm line that keeps the bed looking contained and separate from the grass.
This idea works best along a house foundation or next to a walkway where you want the planting area to feel deliberate. Lay the stones first to set the curve, then add soil and plants behind them. Keep the border low so it does not block water runoff or make mowing harder.
Add Stone Edging To Shape A Narrow Flower Bed

One of the easiest ways to fix a flower bed that has lost all sense of order is to put in a simple stone edge. The old black plastic strip was doing almost nothing, and the plants had spilled out in every direction. Once the gray blocks were set in place the bed suddenly had clear boundaries, and the whole strip along the fence started to read as one intentional garden instead of a tangle.
This kind of edging works best in narrow beds next to a path or fence where you want structure without a big construction project. Clean out the worst of the overgrowth first, set the stones level with the ground, then mulch the bed. The result feels finished even if you keep most of the existing plants.
Define Garden Borders With Natural Stone Edging

The messy strip of weeds and bare dirt along the driveway edge made the whole front look neglected. Once the overgrowth was cleared, a line of rounded stones created a clear border, with gravel and a few shrubs filling the space to keep the lawn and concrete neatly separated.
This approach works best on straight or gently curving edges where the lawn meets a driveway or walkway. Remove the weeds first, then set the stones so they sit slightly above the grass for easy mowing. Keep the planting light so the stone edging stays the focus instead of competing with too many plants.
Define A Sloped Flower Bed With Natural Stone

A weedy hillside often stays messy because there is no clear edge to hold the soil or the plants. Placing a row of large rocks along the slope gives the bed a firm border that keeps everything in place and turns the area into separate planting zones instead of one loose patch.
This idea works on any gentle slope where you want planting without constant erosion. Clear the weeds first, then set the stones to follow the hill’s natural shape. The rocks make it simple to add mulch or new plants later and keep the bed looking intentional even on uneven ground.
Create A Neat Foundation Flower Bed With Stone Edging

Adding a simple stone border can turn a scattered planting strip into a clear garden bed that stays neat over time. In the before photo the mulch ran right up to the grass with no real shape, while the after shows how a low stone edge holds the soil and plants in place so the whole area looks planned instead of accidental.
This idea works best along a house foundation where you want the garden to look finished but still easy to care for. Lay the stones so the top sits just above the soil line, then backfill with fresh mulch and repeat a few plant varieties rather than trying to fill every inch. The edge also makes mowing simpler since the mower wheel can ride right along the stone.
Use Low Stacked Stone To Edge A Narrow Flower Bed
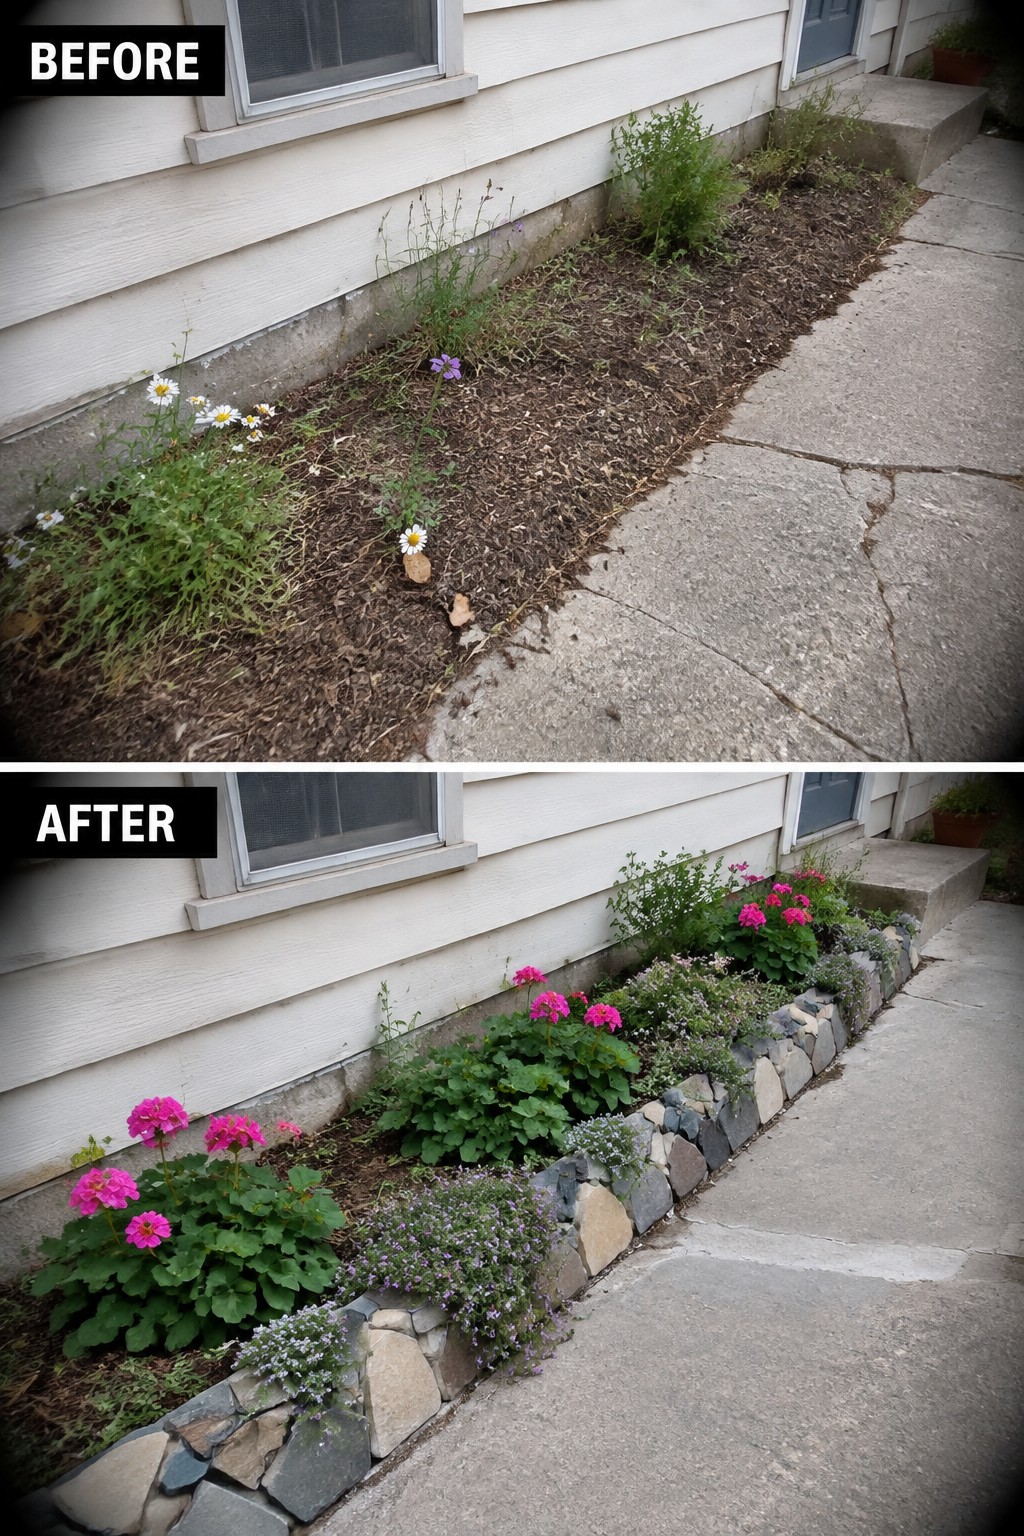
A messy strip along the house can look much more intentional once you add a simple stone edge. The before photo shows an uneven border with scattered plants and no clear line, while the after shows how low stacked stones create a firm boundary that lets the flowers and ground cover sit neatly inside it.
This idea works best on narrow beds next to a walkway or foundation where the main goal is cleanup and shape rather than a full redesign. Lay the stones first so the edge feels solid, then fill in with plants that stay contained. It keeps the bed looking cared for without requiring constant trimming or fancy materials.
Shape Flower Beds With Stacked Stone Edging

A plain mulch strip next to the house can look unfinished, especially when it runs right up against the lawn. Adding a low stacked stone border gives the bed a clear shape and keeps the grass from creeping in. The planting then sits neatly inside that frame instead of spreading out.
This works best along the front of a house where you want simple structure. Lay the edging first to set the line, then add a mix of low shrubs and taller grasses so the bed has some height without looking crowded. It keeps the yard looking cared for even when the rest of the space stays simple.
Use Natural Stone Edging To Define Flower Beds

Natural stone edging gives a neglected strip of gravel and weeds a clear shape. The before photo shows how the area looked scattered and overgrown, while the after version uses large rocks to hold the bed in place and separate it from the sidewalk.
This idea works best along driveways or front walks where you need a simple border that will not shift over time. Clear the weeds first, set the stones firmly into the ground, then fill behind them with gravel and a few sturdy plants. It suits homes with gravel yards or narrow planting strips that tend to look messy without a defined edge.
Add A Simple Stone Border Along A Garden Path

Adding a stone border turns a messy strip of weeds and bare dirt into a clear planting area. The before photo shows an uneven edge running straight along the house with nothing to hold the soil or plants in place. Once the stone is set, the beds look intentional and stay contained even after heavy rain.
This idea works best along foundations or sidewalks where you need a low wall to separate the planting from the path or lawn. Clear the overgrowth first, then set the stones so the tops sit level. Mulch inside the border and keep the planting simple with a mix of annuals and small shrubs so the edging stays the main feature.
Define Garden Beds With Simple Stone Edging

Adding a low stone border turns a loose garden strip into a bed that actually holds its shape. In the before photo the mulch and plants were creeping onto the path, while the after shows everything pulled back into a clean line that follows the walkway.
This approach works best along fences or driveways where the planting needs a clear edge. Lay the stones first so you can see the curve before you plant, then keep the bed no wider than you can reach from the path. It helps smaller yards feel more organized without adding much cost.
Shape A Sloped Front Bed With Stacked Stone

A sloped front bed often looks messy when the edge just runs into the lawn. Adding a low stacked stone border gives the bed a clear line, holds the mulch in place, and makes the plants look more intentional. The change from bare soil and ragged grass to a neat curve of stone is what makes the whole front look cared for.
This idea works well on any gentle slope where you want the bed to stay defined without a tall wall. Keep the stone two or three courses high so it still feels natural, and match the curve to the house rather than forcing a straight line. Start with the edging before you add more plants, and the bed will look finished even with simple flowers and ground cover.
Define Garden Beds With Natural Stone Edging

The before photo shows a wide stretch of patchy grass running straight into the patio with no clear line between lawn and planting areas. After, a border of river rock and flat pavers creates a clean edge that separates the lawn from new flower beds filled with mulch and perennials.
This idea works best in backyards where the grass and garden spaces feel like one big open area. Lay the stone first to set the shape and size of each bed, then fill inside the border with soil and plants. It keeps the layout simple to maintain and helps smaller yards feel more organized without adding walls or fences.
Edge A Front Flower Bed With Flat Natural Stones

A bare strip of gravel and weeds under a window can make the whole front of a house look unfinished. Laying a row of flat stones along the edge turns that same space into a clear planting area that stays neat and contained.
This idea works best along a house foundation where you want low plants without a lot of fuss. Clean the ground first, set the stones in a simple line or gentle curve, then add soil and a few shrubs or perennials. It suits homes with a small lawn strip and keeps the beds looking intentional without crowding the walkway.
Replace Plastic Edging With Natural Stone Borders

The before photo shows a flower bed that had lost its shape. The plastic edging had shifted and the plants had grown wild, making the whole front look a bit unkempt.
Switching to natural stone blocks gives the bed a solid border that stays in place and looks intentional. This works well along the front of a house where the bed follows the walkway or porch. Start by removing old edging and overgrown plants, then lay the stones level with the lawn so mowing stays easy. Choose a stone that matches your house or walkway for a pulled-together look without spending much.
Create A Defined Bed Along A Brick House

A simple stone border turns an untidy strip of weeds and bare soil into a clear planting area. The low stacked stone gives the bed a finished edge that separates it from the path and keeps everything looking intentional instead of neglected.
This approach works best along a house wall or walkway where the space is long and narrow. Clear the weeds first, then set the stone to establish the shape and height you want before planting. The edging makes future maintenance easier and helps the bed hold its form over time.
Add Stone Edging To Define A Garden Bed

A row of simple stone blocks turned a patch of bare dirt and random pots into a clear garden bed. The curved edge keeps the plants contained and gives the lawn a clean stop instead of a ragged line where grass meets soil.
This approach works best in small yards where you want structure without spending much. Lay the stones first, then add soil and plants inside the border. It makes weeding and mowing easier and keeps the bed looking intentional even when the planting is still filling in.
Define Flower Beds With Stone Edging
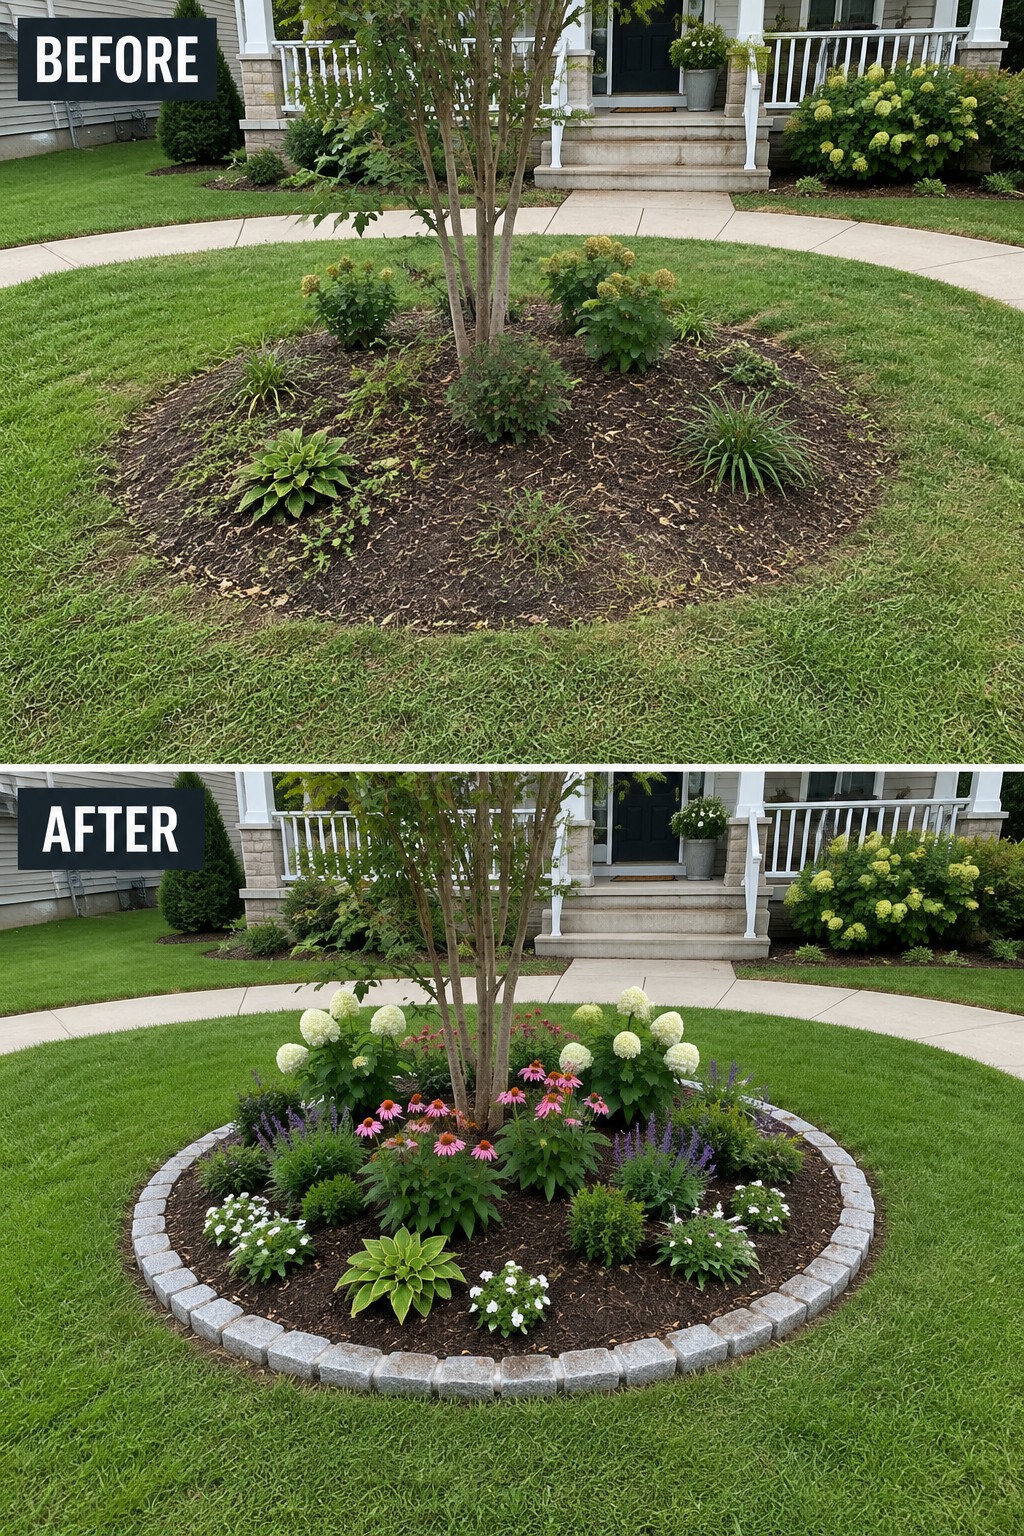
The before photo shows a loose mulched circle that faded into the surrounding grass. Adding a low stone border gives the bed a clear shape and stops the mulch from spreading.
This idea works best around trees or in open lawn areas where you want the planting to feel separate and finished. Lay the stones level with the grass so mowing stays simple, and keep the bed width narrow enough to reach the center without stepping on plants.
Edge A Shaded Tree Bed With Natural Stone

A bare stretch of dirt and exposed roots under mature trees can look unfinished and hard to maintain. Adding a low border of natural stone gives the area clear shape and turns it into a proper planting bed that stays neat over time.
This idea works especially well in shaded spots where grass will not grow well. Lay the stones in a gentle curve that follows the tree line, add mulch inside the border, and fill with shade plants that can handle root competition. The stone keeps soil from washing out and makes mowing or trimming around the edge much easier.
Create A Stone Border Around A Mailbox Flower Bed
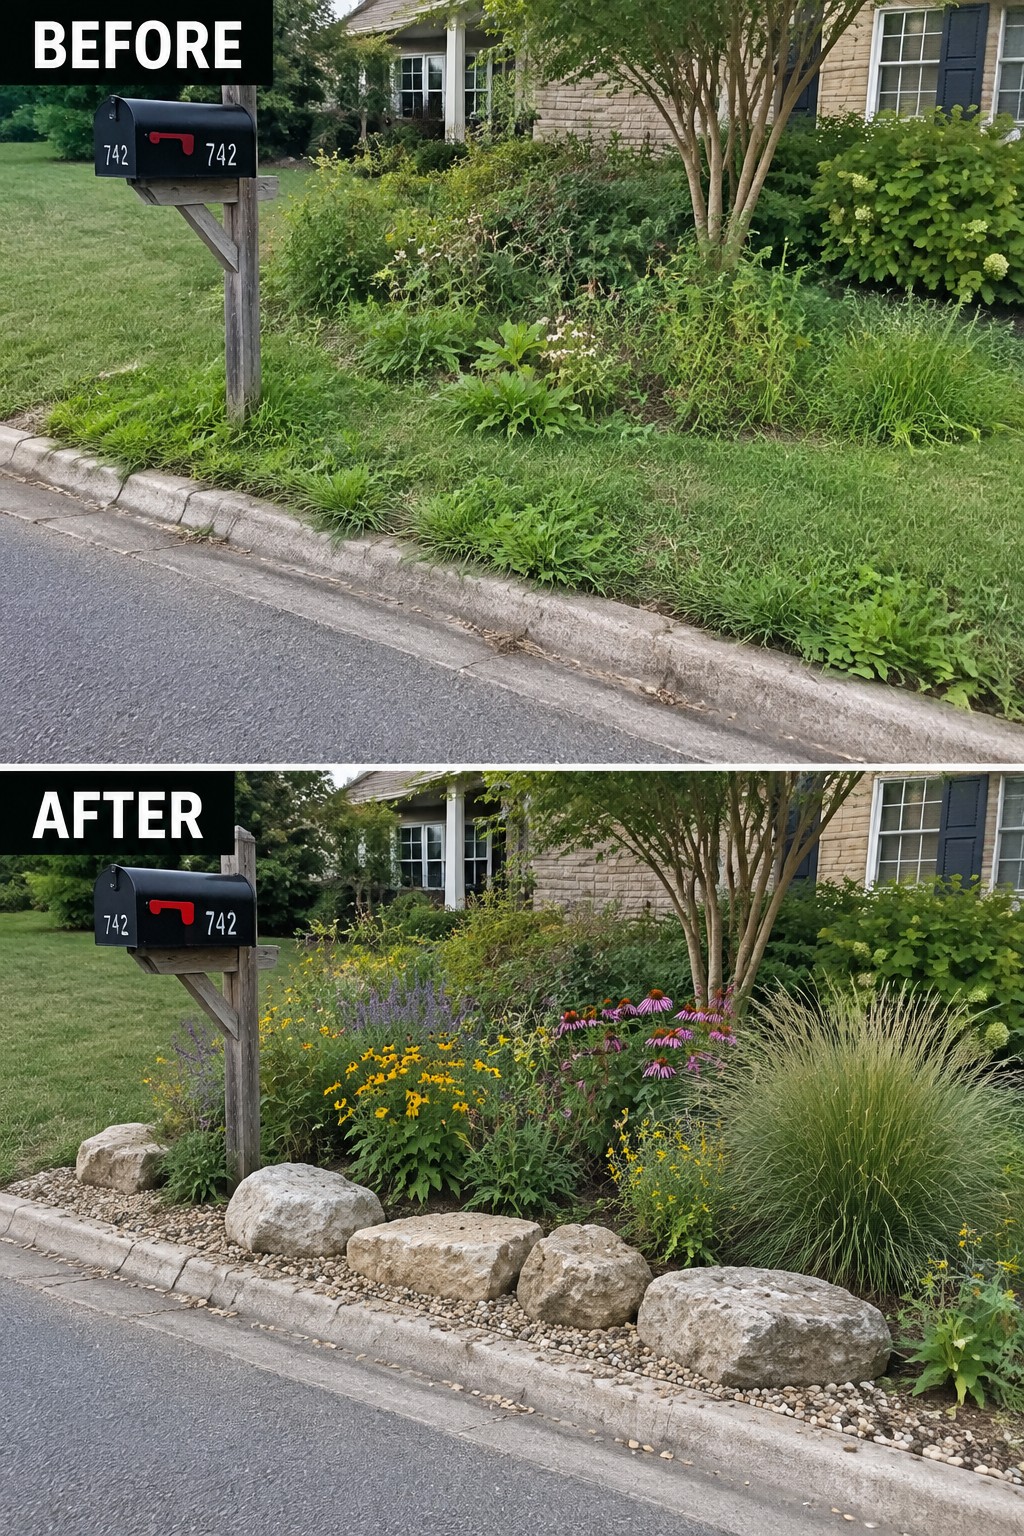
The biggest change here is the shift from a loose, overgrown lawn edge to a clear boundary made with large stones and gravel. That simple line keeps the planting area separate from the grass and gives the whole front strip a much tidier look without needing a full redesign.
This approach works best along curbs or sidewalks where grass tends to creep in. Lay the stones first to follow the natural curve, then add a thin gravel layer between them and the plants. It holds up to foot traffic and makes mowing easier since you no longer have to fight ragged edges.
Add Stone Edging To Clean Up A Front Flower Bed
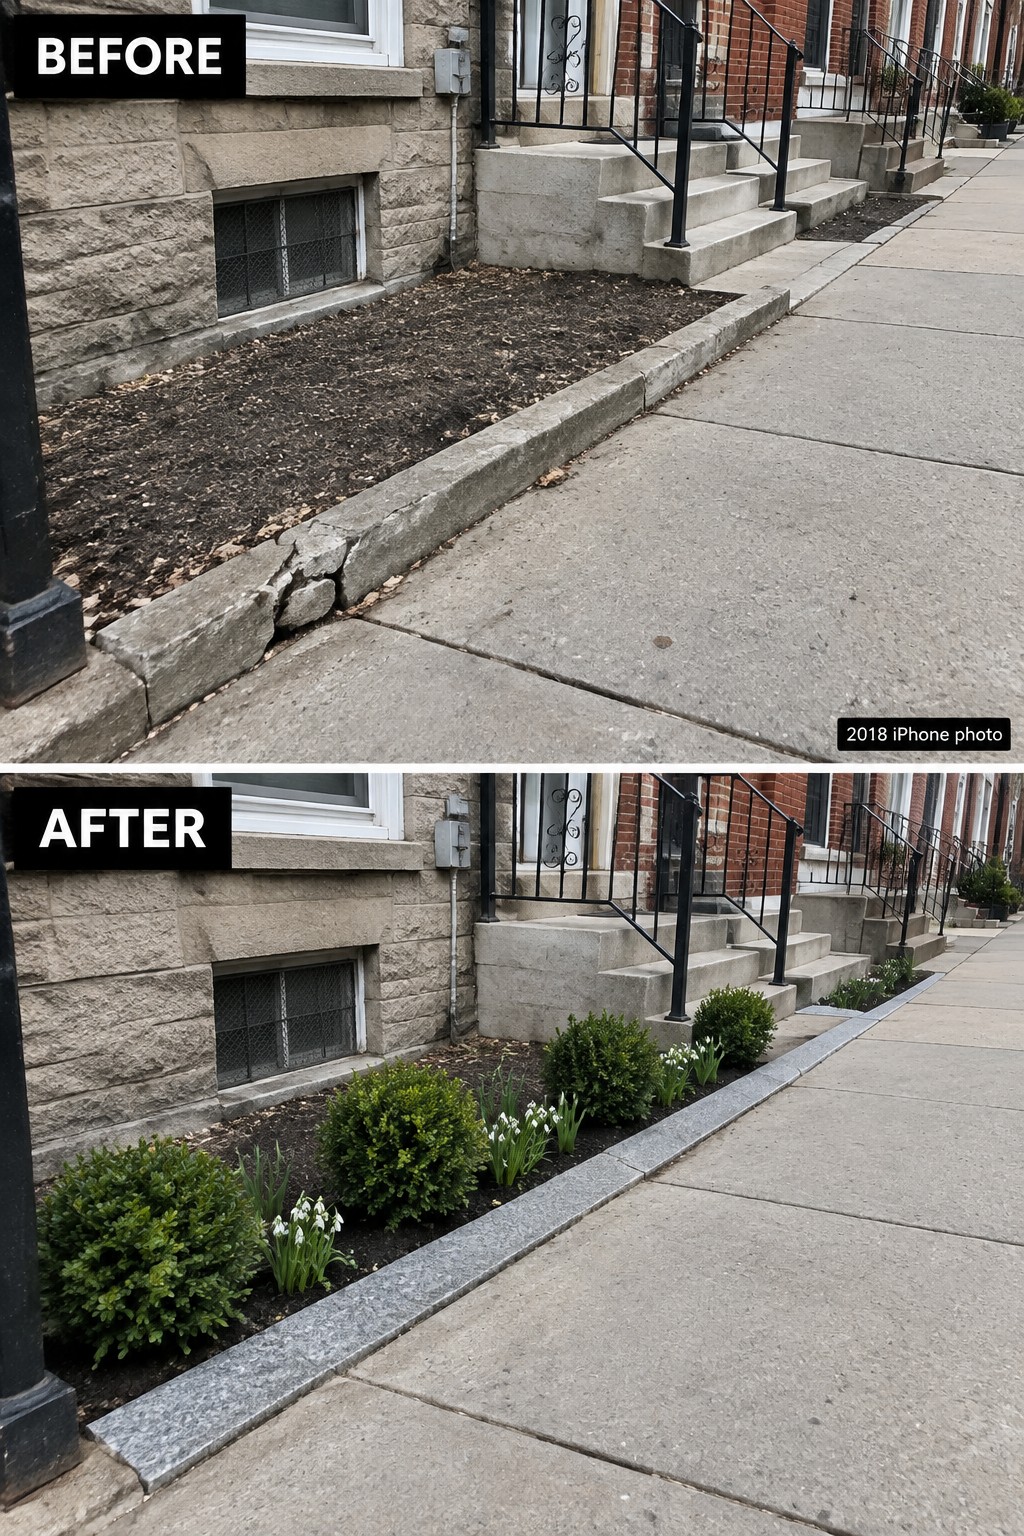
A simple stone border turns a bare dirt strip into a proper flower bed. The uneven ground next to the sidewalk gets replaced by a straight edge that holds mulch and plants in place, which instantly makes the front of the house look cared for.
This idea works best on narrow beds along the street where you want a clear line without adding a lot of height. Fix the edge first, then plant. The stone should feel solid but not take over the walkway, and it helps keep soil from washing onto the sidewalk after rain.
Add Stone Edging To A Flower Bed

The main improvement comes from laying a simple line of stone pavers along the garden edge. Before, the bed had no clear border and mulch kept spilling onto the path. After, the pavers create a firm line that holds the soil and plants in place while the low stone lights mark the edge at night.
This works best along paths or driveways where beds tend to look messy. Clean the area first, then choose pavers that sit close to the ground so they do not become a tripping hazard. Add a few lights only if you walk the path after dark. The edging itself is enough to make the bed feel finished.
Add Natural Stone Edging To A Sidewalk Strip
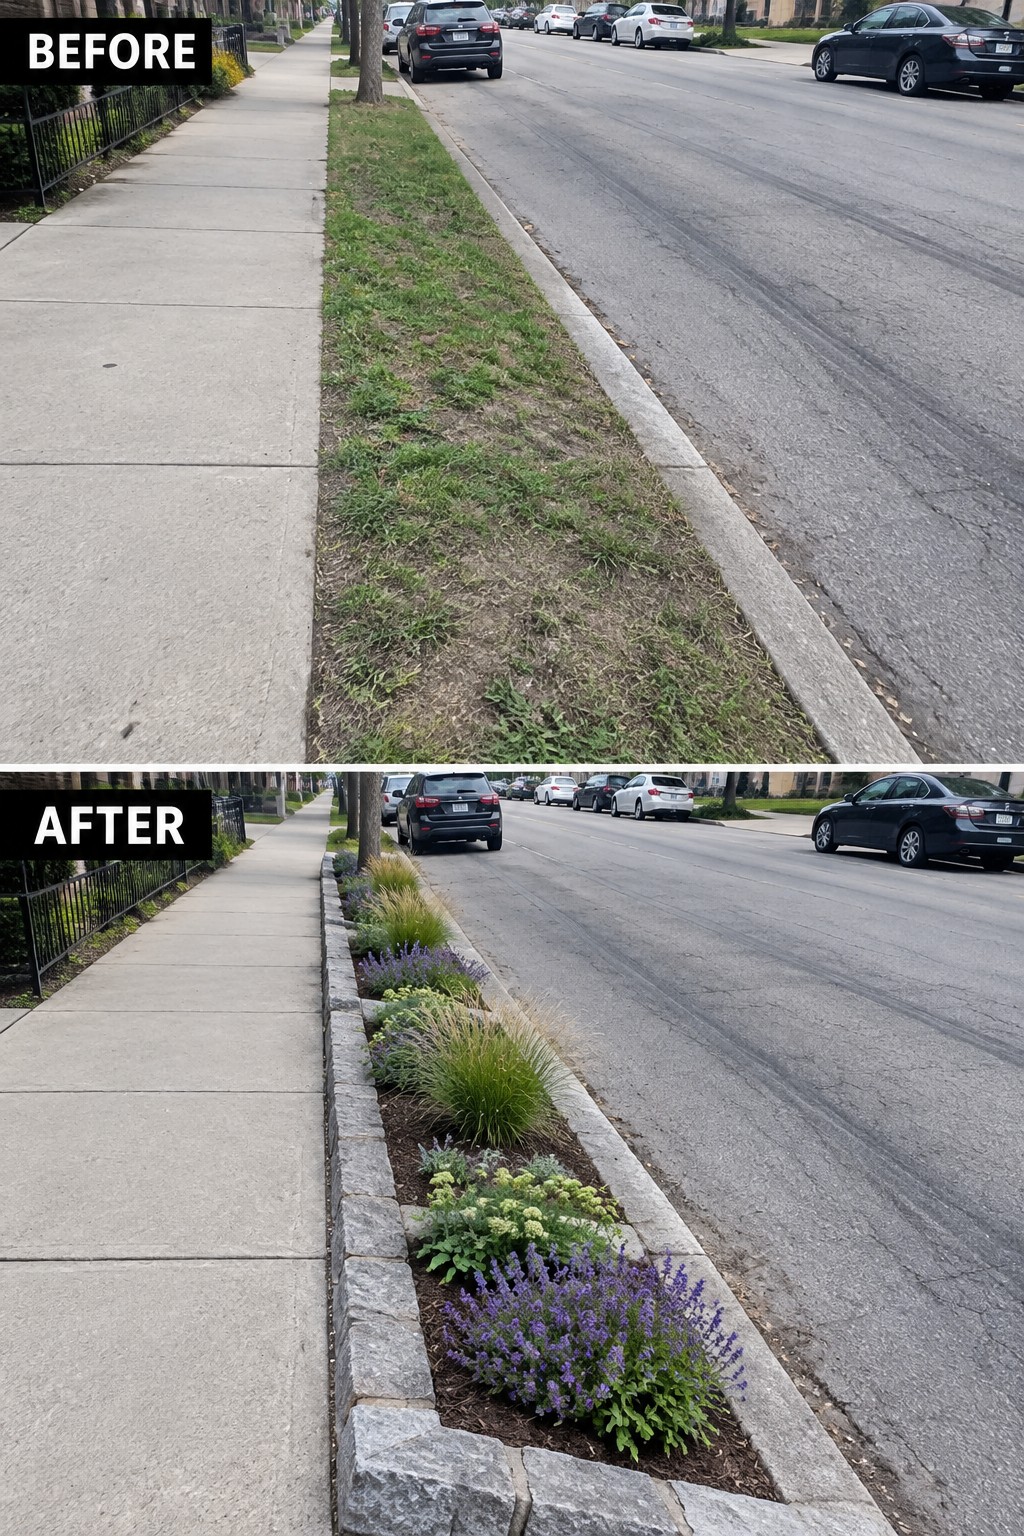
A messy grass strip between the sidewalk and the street often looks neglected because it has no clear edge. Adding a low stone border turns that same narrow space into a proper planting bed. The stone keeps the mulch and soil in place while giving the whole front a tidier line that follows the curb.
This works well on any home where the strip is too small for big features. Keep the plants low so they do not block the walk or the view from the car. Start with the stone and mulch first, then add just a few types of plants that can handle the sun and occasional road salt.
Use Stone Edging To Frame A Patio Planting Bed

A bare rectangle of soil in the middle of the paving looked like an afterthought. Adding a low border of dark stone blocks gave the area a clear shape and turned it into a finished garden bed that sits neatly within the hardscape.
This idea works well on patios or side yards where you want planting without breaking up the floor surface. Keep the edging low so it does not become a tripping hazard, choose a stone color that blends with the paving, and fill the bed with a simple mix of shrubs and succulents rather than overcrowding it.
Add Natural Stone Edging To Flower Beds

A simple stone border can turn a messy front bed into something that looks intentional. The before photo shows a bed that had no clear edge and just ran into the lawn. Once the low stone edging went in, the bed gained a clean shape that stays put even after the plants fill in.
This idea works best on small to medium beds near the house or along a walkway. Lay the stones first so you can adjust the curve before you commit, then add fresh mulch and repeat a few plant colors inside the border. It keeps the bed from creeping into the grass and makes the whole front look more cared for without a big redesign.
Add Stone Edging Along A Fence-Side Garden Bed

A messy strip of weeds and scattered plants along a fence can make the whole yard feel neglected. Adding a simple line of natural stone gives the bed a clear shape, holds the mulch in place, and turns the area into something that looks planned instead of leftover.
This idea works best on long, narrow beds where the edge has started to blur into the lawn. Clean out the overgrowth first, then set the stones low and follow the natural curve of the grass. Once the border is set, fill the bed with a mix of taller grasses, shrubs, and lower flowers so the planting feels full but still easy to maintain.
Frequently Asked Questions
Q: How do I stop the stones from shifting after a hard rain? A: Set each stone on a firm base of packed gravel or soil so it sits level from the start. Walk along the line and press down firmly once everything is in place. That simple step keeps most pieces from moving even when water flows through.
Q: What works if my flower bed curves around a tree? A: Choose flatter stones that overlap slightly at the edges. They bend with the shape without leaving gaps that let soil spill out. Check the fit as you go and trim back any roots that get in the way.
Q: Will the edging block water from reaching my plants? A: Leave a small gap between stones near the bed so rain can soak in. Water still reaches the roots easily this way. You can always add a soaker hose along the inside if the soil dries out faster than you like.
