
When I started my first raised bed garden a few years back, I realized a smart layout keeps everything reachable and growing steadily without constant rework. The paths between beds catch your eye right away, setting up smooth access that makes daily tending feel natural instead of a chore. Beds crammed too close fail fast as plants sprawl. In my yard, straightforward rows edged with simple gravel held up best through seasons of rain and expansion. A handful of these beginner setups are easy to adapt to your slope or sun patterns, so grab a notebook and test one soon.
Rustic Raised Bed Herb Garden
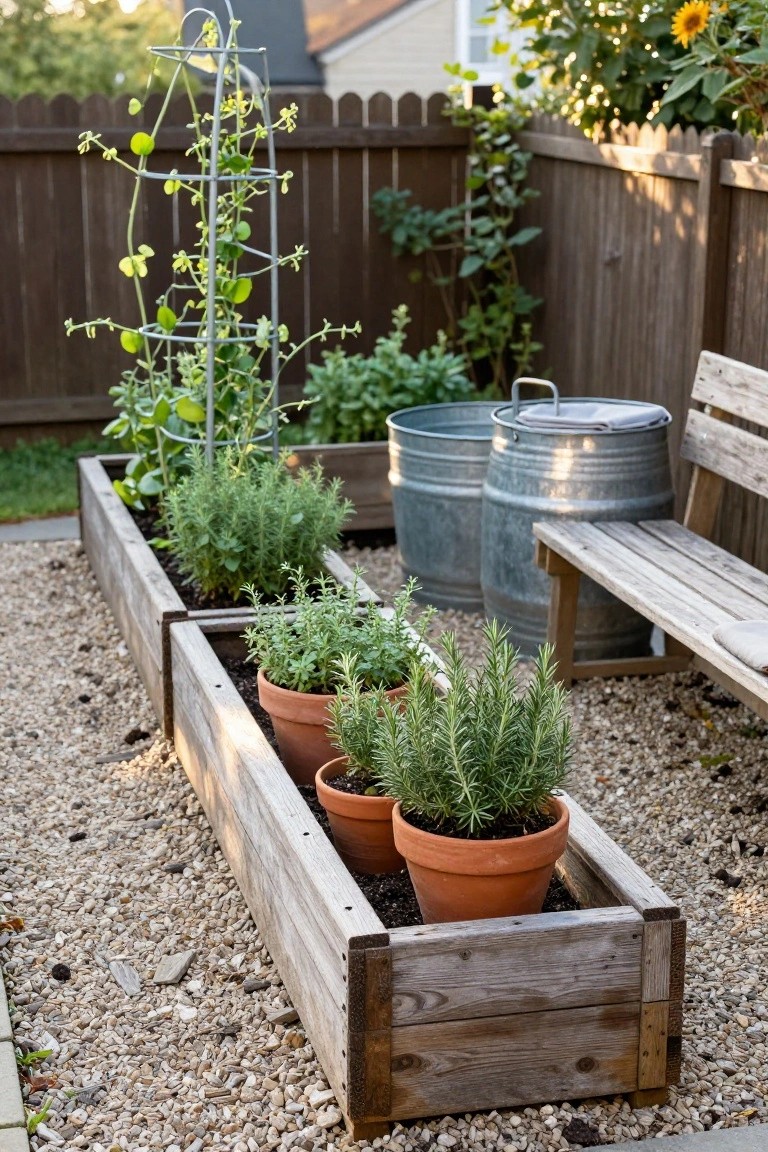
Raised beds like these wooden ones make starting a garden dead simple. You just fill them with soil and pop in easy herbs such as rosemary and thyme. They keep everything organized and off the ground. Plus that gravel path and nearby bench turn the spot into a real hangout area. The trellis adds height without much fuss.
These work great in small backyards tucked against a fence. Go for untreated wood to keep costs down. Mix in pots for extras like more rosemary. Watch the drainage though… raised beds need holes at the bottom. Perfect for beginners who want fresh herbs without digging up the whole yard.
Circular Raised Beds with a Central Fire Spot

This setup uses curved stone walls to form a round raised bed that’s perfect for beginners. You plant right along the edges with easy greens like lettuce and kale, plus pretty lavender and daisies for color. The middle stays open for a simple metal basket that holds a fire on cool evenings. It pulls the garden into one cozy spot. No wasted space.
Put this in a sunny yard corner where you want to sit and enjoy the harvest. Stack local stones for the walls, keep them about knee-high, and fill with good soil. Add a brick path leading in so it’s easy to reach everything. Works great near a patio or back door… just watch that the fire basket doesn’t scorch nearby plants.
Raised Beds Lining Garden Steps

One straightforward way to handle a sloped backyard is with raised beds running along both sides of simple steps. Here, wooden frames hold pears hanging from young trees, tomatoes on supports, and herbs in pots. The path in between makes it easy to tend everything without slipping on dirt or mud. It turns an awkward hill into useful growing space.
This layout suits beginners with narrow or tiered yards. Build the beds from cedar or pine boards, about knee-high, and fill them with a mix of soil and compost. Stone or concrete steps work best for the path, since they drain well. Keep plants spaced for air flow, especially fruit trees. Just check that your slope isn’t too steep, or add more steps.
Boxwood Row Edges a Garden Path

A straight line of trimmed boxwood shrubs runs alongside this concrete walkway. They form a tidy green border that separates the path from the lawn without needing much space. It’s a classic look that adds order to a side yard, and those round shapes keep it simple and forgiving for new gardeners.
You can plant boxwoods like this in narrow spots next to houses or fences. Space them about two feet apart in a mulched bed for easy upkeep. Trim once or twice a year to hold the shape. It suits sunny or part-shade areas… just watch for deer if you’re in a wooded spot.
Symmetrical Raised Bed Garden Layout

This setup takes simple raised beds and arranges them in a loose circle. Terracotta rectangular beds sit around a central round one, all filled with bright orange flowers like nasturtiums. Gravel fills the paths between, keeping things tidy and walkable. It’s a clean way to define a garden space without much fuss.
It works best in a small backyard corner, maybe near a fence or patio. The uniform color ties it together, and the shapes add a bit of interest. Beginners can start with affordable concrete blocks or buy pre-made beds. Just keep paths wide enough to reach every plant… no bending over muddy rows.
Simple Raised Bed Path Layout
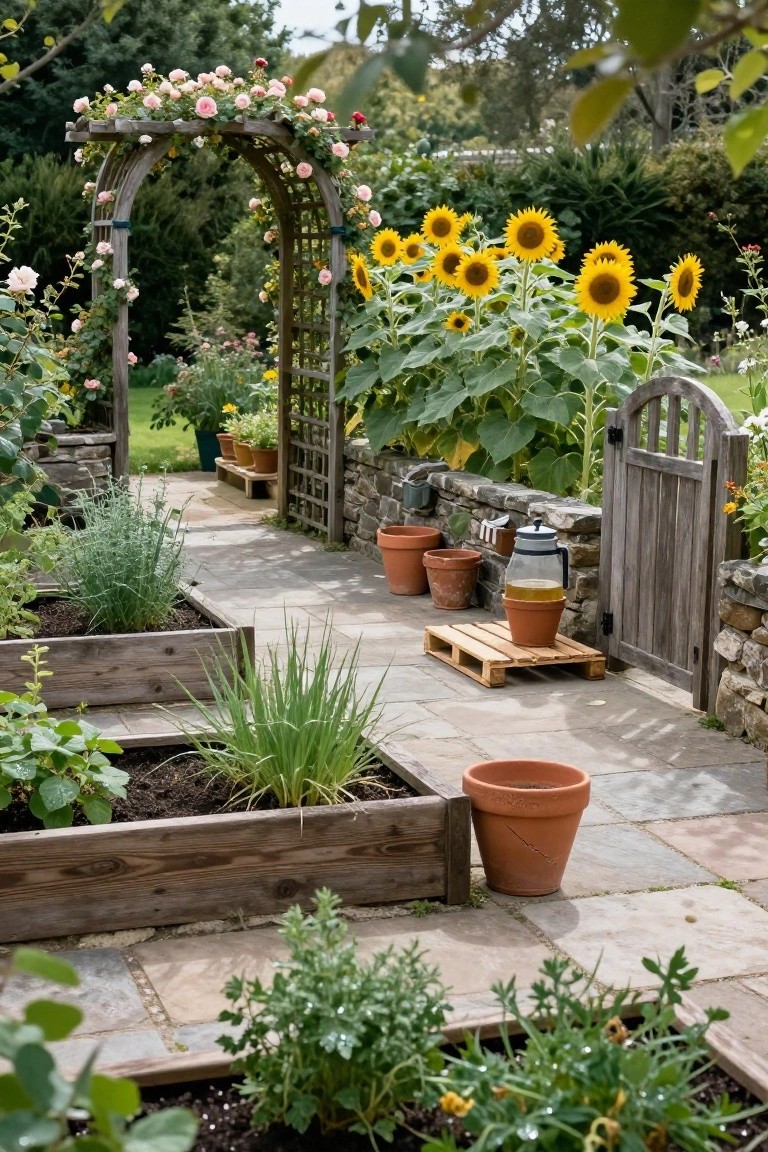
One straightforward way to organize a beginner garden is lining a walkway with wooden raised beds. Here the stone path runs right between matching beds filled with greens and herbs. It keeps everything tidy and gives you direct access for weeding or picking without stepping into the soil. That arch covered in roses up front adds a nice entry feel too.
This works best in a narrow side yard or along a fence where space is tight. Start with 4-foot-long beds about a foot high, using cedar or pine that lasts a few seasons. Plant low stuff near the path edges so it doesn’t flop over. Just make sure the path drains well after rain… no one wants muddy shoes.
Linear Raised Beds Along a Garden Path
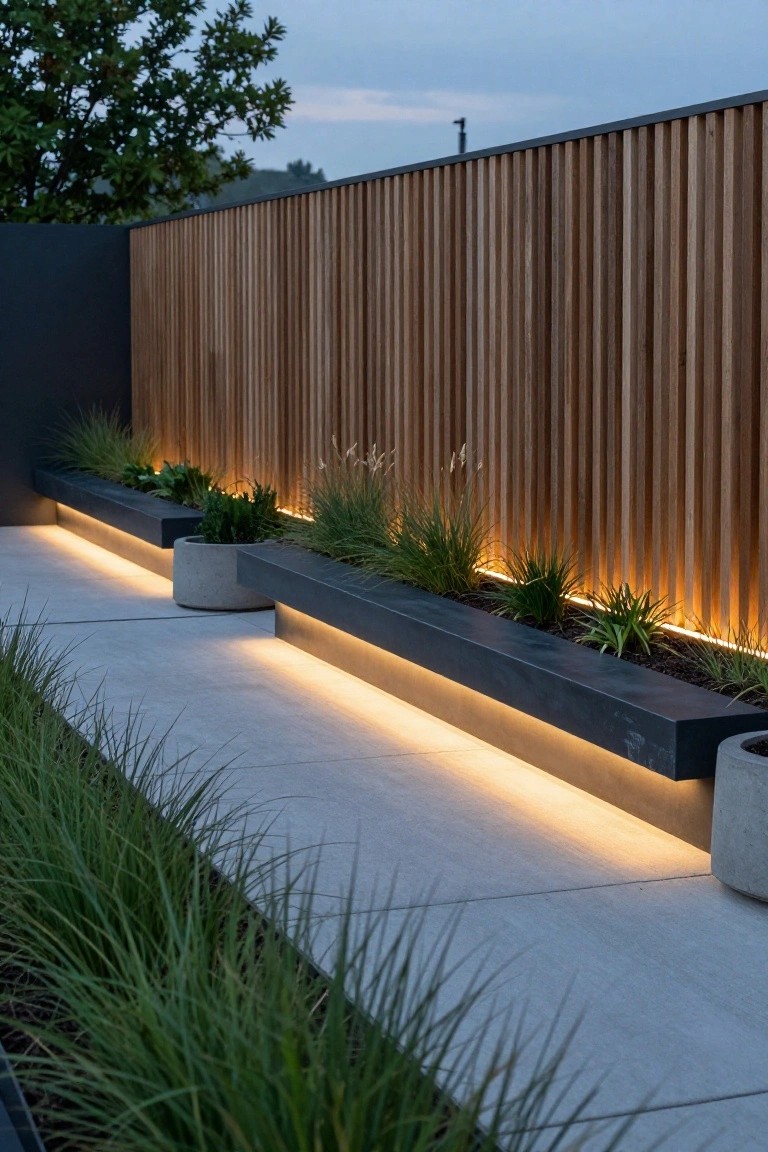
One straightforward way to set up raised beds is lining them straight along both sides of a path. Here, black concrete planters hold grasses and low plants, with LED strips tucked under the edges for a soft glow at dusk. It keeps the walkway clear while making the garden feel put-together and easy to follow.
This layout works well in skinny side yards or leading to a back patio. Beginners can build or buy simple rectangular beds, fill them with drought-tolerant stuff like fountain grass, and add basic underlighting. Skip anything too tall that might crowd the path, and it stays low-maintenance.
Raised Beds with a Stepping Stone Path

One easy way to set up a beginner garden is lining up wooden raised beds along a simple path of flat stones. This layout keeps everything organized without much fuss. The beds hold your plants neat and off the ground, while the stones give you a dry spot to walk between them. Mulch fills the gaps to cut down on weeds, and a few wildflowers along the edges add color without extra work.
You can fit this in a narrow side yard or along a fence, like here next to some trees. Start with cedar or pine beds about a foot high, space them with stones that match your yard’s look, and plant easy stuff like herbs or veggies. Watch the path drainage so it does not get muddy after rain. A chalkboard nearby helps label what is growing.
Raised Beds with a Central Path

One straightforward way to set up a beginner garden is lining up two long raised beds parallel to each other, with a simple path running right down the middle. This keeps everything organized and easy to get to. You see strawberries, greens, and herbs filling the beds here, and the gravel path makes walking through without compacting the soil a breeze. It fits nicely in a narrow backyard spot.
Try this in tight spaces like along a fence line. Use untreated wood for the beds, about knee-high for comfort, and fill them with good garden soil. Plant what you like to eat close together for better yields. Watch the watering though. That central path lets you reach both sides without stretching too far.
Simple Stone Raised Beds for Herbs

Raised beds made from natural stone walls give your garden a clean, defined look without much fuss. They’re perfect for beginners who want structure that lasts. In this setup, rosemary bushes and agave fill the beds nicely, with gravel mulch keeping weeds down and paths easy to walk. A big olive tree nearby adds some height without crowding things.
These work best in sunny, dry yards where drought-tolerant plants do well. Stack local stone for the walls, maybe 18 inches high, and fill with well-draining soil. Keep paths between beds wide enough for a wheelbarrow. Just make sure good drainage or your herbs might get too wet after rain.
Raised Bed Garden with Central Path

A straightforward way to organize your garden is with raised beds lined up along a central walkway. Here square wooden beds hold young plants like cabbage and grasses, all labeled neatly. The stone path runs right down the middle, making it simple to walk between beds without stepping on soil. Add a bench at one end for a quick rest while you tend things.
This layout works best in smaller backyards where you want easy access without crowding. It suits beginners building their first veggie patch. Stick to simple square shapes and gravel edging to keep costs down. Watch the bed height, though. About 12 inches is plenty for most roots.
Simple Stone Steps for Sloped Gardens

Stone steps like these make getting around a sloped yard a lot easier. They’re built right into the hill with rough natural slabs that fit the ground’s shape. Tall grasses and plants fill in around the edges, so it all blends together without looking forced. The logs along the sides add a sturdy border that keeps soil in place.
You can use this setup in any backyard with a hill or embankment. Start by digging out level spots for each step, then set the stones and backfill with dirt for raised planting beds. Add a handrail if the rise is steep. It works great for beginners since it’s low fuss once planted, and those grasses come back strong each year.
Balcony Trough Raised Bed for Herbs

A simple galvanized metal trough makes a great raised bed for tight spots like balconies. Fill it with easy growers such as basil, peppers, and a few trailing plants. It keeps soil contained and raised up from the floor. That way you avoid mess on your balcony surface. Plus the metal holds up to weather without much upkeep.
Set one along the railing or wall where it gets good sun. Mix in heights like taller basils in back and peppers up front for easy picking. A small stool nearby lets you sit and tend things. Works best for renters or small apartments. Just drill drainage holes if needed and line with landscape fabric first.
Raised Beds with a Central Water Channel

This setup uses simple raised beds lined up along a narrow stone channel that carries a bit of running water right down the middle. It keeps everything neat and reachable without stepping into the soil. The vegetables like strawberries and kale grow strong in the beds, and that gentle water flow helps with irrigation on hot days. Bamboo fencing around the edges adds privacy without crowding the space.
You can build this in a sunny backyard strip or along a side yard. Start with wood or stone for the beds, about knee-high, and lay flat stones for the path with a slight slope for water to trickle through from a hose or small pump. It suits beginners because it’s straightforward to plant, weed, and harvest. Just watch that the water doesn’t pool, and use gravel at the ends to drain it off.
Linear Brick Raised Beds for Succulents
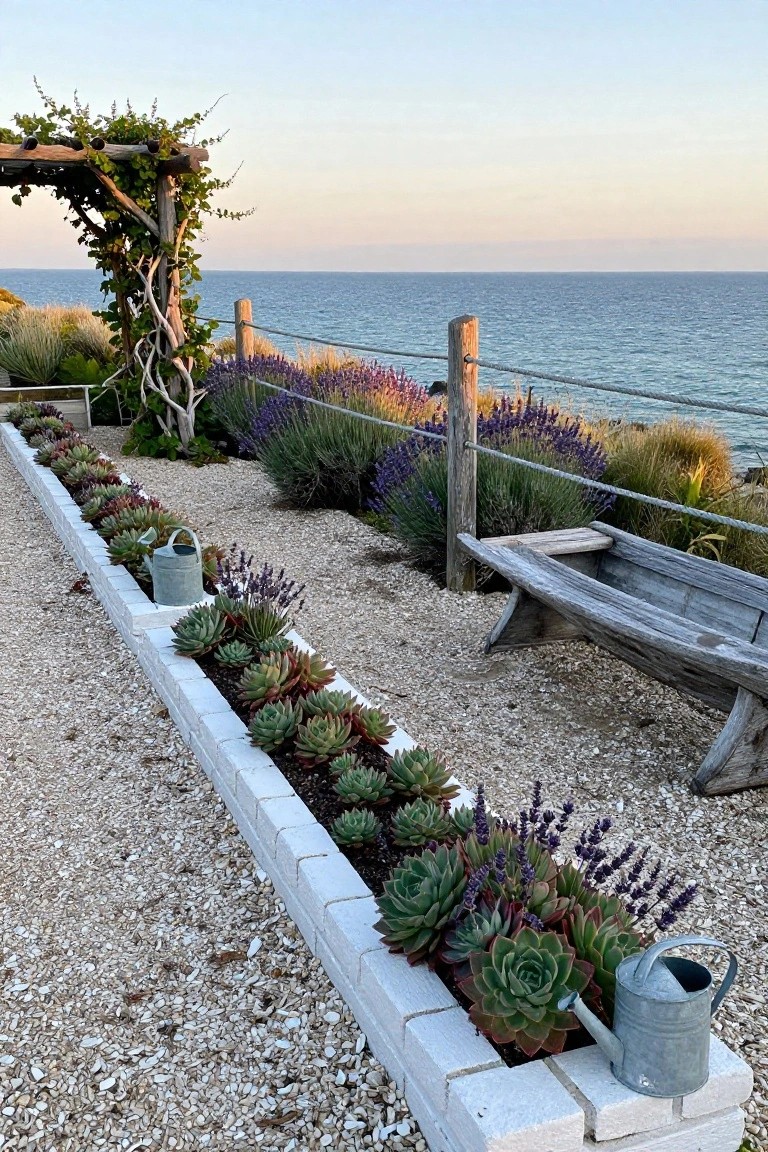
Straight white brick walls form these raised beds, lined up along a gravel path and filled with plump green and reddish succulents plus spikes of lavender. The look stays neat without much fuss. Drought-tolerant plants like these thrive in full sun, and the bricks hold soil in place on a slope.
Try this in a sunny side yard or along a walkway where space is narrow. Stack concrete blocks or bricks two or three high for beds about a foot wide. Fill with well-draining soil and succulents that need little water. It suits coastal spots… or anywhere hot and dry.
Vertical Tiered Raised Beds Against a Wall

One smart way to fit more plants into a tight yard is stacking raised beds vertically like this. Galvanized metal troughs bolted together make four levels right up against the brick wall. Tomatoes are already producing, and herbs fill in the gaps. It keeps everything off the ground and easy to reach.
This works best in a sunny spot with decent wall support. Beginners can start with veggies and herbs that don’t need much room to spread. Just make sure the stand is sturdy, and water from the top so it trickles down. Fits rentals or narrow side yards perfectly.
Frequently Asked Questions
Q: How much space do I need between raised beds for easy access?
A: Aim for 18 to 24 inches between beds. You walk comfortably and reach every plant without stretching. If you push a wheelbarrow through, go a bit wider.
Q: Can I squeeze a raised bed garden into a tiny backyard or patio?
A: Yes, start with one 4×4 foot bed. Tuck it against a fence or wall to save room. Stack veggies vertically with trellises for max yield.
Q: What if I want to mix flowers and veggies in the same layout?
A: Plant flowers like nasturtiums along the edges. They draw pollinators right to your veggies. And they hide bare soil nicely.
Q: Do I rotate crops each year in these beds?
A: Rotate them to keep soil healthy. Move tomatoes to a different bed next season. Beans or greens follow and fix nitrogen naturally.