
I have noticed that a greenhouse tends to work best when it sits in a spot that gets steady sun without blocking the rest of the yard flow.
Many plans overlook how often you will actually walk out there to water or check plants during different seasons.
In my own attempts I found that starting with a simple frame helped me see what needed to change before I spent more on walls or shelves.
Budget builds can look fine at first but often need extra bracing once wind and rain test them over a full year.
Choosing a size that matches the space you have makes the whole setup feel more practical than oversized ideas that end up half used.
Lean-To Greenhouse Against an Existing Wall

A lean-to greenhouse makes good sense when you want to keep costs down. By building against an existing wall you only need to frame three sides instead of four, and the shared wall helps hold heat. The setup in the photo shows how simple wood framing and glass panels can create a useful growing space without a big budget.
This style works well in smaller gardens or beside a shed or garage. Place raised beds along the sides and leave a narrow path down the middle so you can reach everything easily. Just make sure the wall faces the right direction for sun and that the roof has enough slope for rain to run off.
Mount a Chalkboard for Garden Task Reminders

A chalkboard attached to the greenhouse door gives you a simple spot to list daily or weekly chores. It keeps reminders about watering, mulching, and feeding plants right where you need them, without extra paper or apps.
This idea works in most small backyard gardens and pairs well with basic wooden or metal greenhouse frames. Place the board at a comfortable height near the entrance so you can update it after a quick walk through the beds.
Hoop House Greenhouses For Home Vegetable Gardens
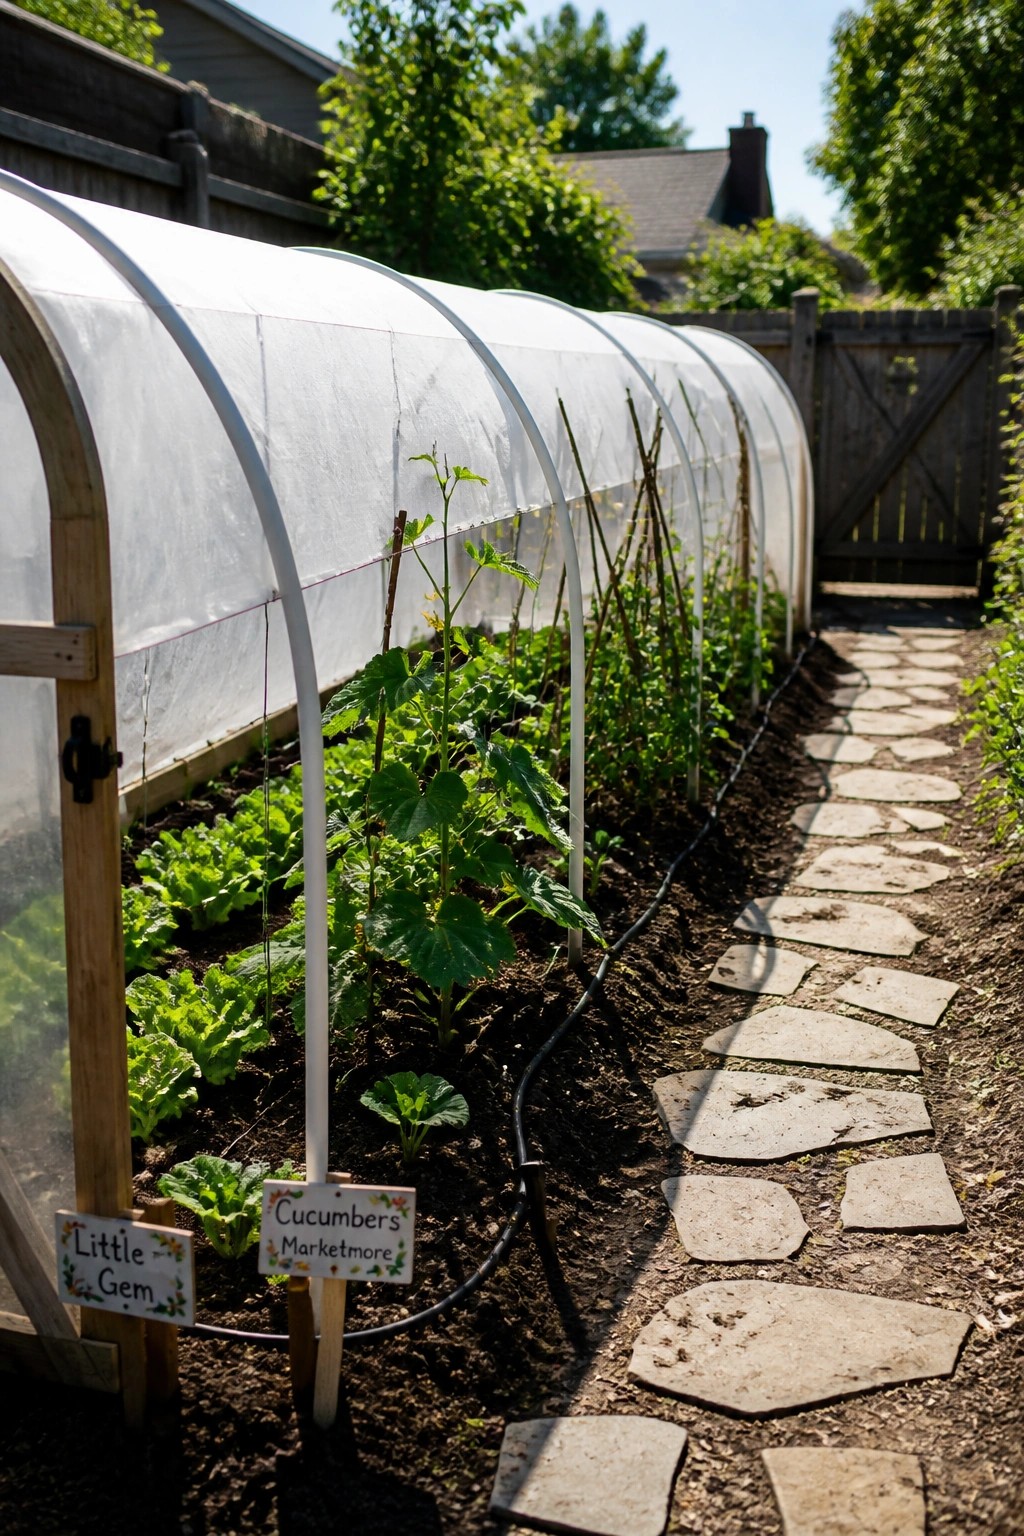
A hoop house gives you a simple way to extend the growing season without spending much. The arched plastic cover keeps plants warmer and shields them from wind and light frost while still letting in plenty of light.
Place the structure over an existing bed or run it beside a garden path so you can reach both sides easily. Label sections for different crops and keep the design basic with basic hoops and sheeting so it stays affordable and quick to put up.
Salvaged Windows For Greenhouse Walls

Old windows work well when you want to build a greenhouse without spending much on new materials. They already have the glass you need and often come in sizes that fit together into simple wall sections. This approach gives the structure a natural look that fits right into a backyard garden.
Look for windows at salvage yards or from house renovations in your area. Check that the frames are solid and plan how they will line up before you start building. The setup works best for smaller greenhouses where you can handle the weight and sealing on your own.
Add Raised Beds Next to Your Greenhouse

Many people like placing raised beds right beside the greenhouse because it keeps the workflow simple. Plants can move from the protected space straight into the beds without extra hauling, and the whole area stays organized in one corner of the yard.
This setup works best on a paved or gravel base where drainage is good. Metal beds hold up well against moisture from the greenhouse, and they give you a clear edge that keeps soil from spilling onto paths. Leave enough room between the beds and the door so you can still wheel a cart through easily.
Raised Stone Beds Around The Greenhouse

Stacked stone makes a simple and sturdy way to build raised beds right up against a greenhouse. The low walls hold the soil in place, keep plants organized, and create a clear edge that separates the growing area from the path. Many people like this look because it feels permanent without costing much if you can find local stone or reuse old pieces.
This setup works best in smaller yards where you want herbs and vegetables close to the greenhouse for easy care. Keep the curves gentle so the beds do not crowd the structure, and make sure the wall height stays low enough for comfortable reaching. A few plant markers can help keep things tidy season after season.
Make A Wooden Cold Frame For Early Crops

A simple wooden cold frame gives you an easy way to start vegetables weeks ahead of the normal season. The box shape made from basic lumber holds in warmth and shields young plants from late frosts without needing a full greenhouse.
Set the frame directly into the garden soil so plants can root in place. It suits small yards or raised beds and works best if you check the temperature on warm days to keep seedlings from overheating.
Place a Greenhouse on Your Deck

Many people add a small greenhouse directly onto their deck or rooftop because it turns an ordinary outdoor space into a productive growing area without taking over the whole yard. The structure stays close to where you spend time, so watering and checking plants becomes part of your regular routine.
This setup works well on flat decks that can handle the weight and where you already have seating nearby. Keep the greenhouse a few feet from your main bench or table so the area stays easy to move around in and does not feel crowded.
Add Built-In Shelves For Greenhouse Storage

Built-in shelves give you a simple way to keep plants organized and easy to reach without crowding the floor. In a small greenhouse, this kind of storage turns the walls into useful growing space while still leaving room to move around.
You can build them from basic wood and add a lower level for extra pots and trays. This works best in a budget setup where you want everything close to the work area and sink.
Repurposed Crates Make Simple Planters

Old wooden crates or traps work well as raised planters right outside a greenhouse. They keep plants organized, add height without much cost, and blend into a gravel path setup without looking too finished. The rough texture pairs nicely with stone steps and keeps the whole area feeling practical rather than decorative.
Place them along the edge of a path where you need extra growing space but do not want to build permanent beds. They suit small yards or anyone starting with limited materials, though they may need lining if the wood has large gaps. Check the crate is sturdy enough to hold soil before filling it.
Painted Stepping Stones Make Simple Garden Paths

Painted stepping stones give a greenhouse setup an easy way to stay accessible without spending much. They keep the ground from turning into a muddy mess after rain and help mark a clear route from the main garden to the door. The bright colors also make the whole area feel more cheerful on a small budget.
This idea works best in backyard gardens where space is limited and you want to avoid pouring concrete or laying heavy pavers. Use old concrete rounds or cheap pavers, seal them well, and place them in a loose line. Just check the paint holds up in your weather before you commit to a long path.
Attach Your Greenhouse To An Existing Wall

Attaching a greenhouse to an existing wall cuts down on materials and helps keep the inside temperature more stable. It also makes the structure feel like a natural part of the garden instead of something added on later.
This approach works best on south or southeast facing walls where plants get steady light. Just be sure the base has good drainage and the roofline lines up with any nearby windows or doors so water runs off properly.
Build Your Greenhouse On A Brick Base

A low brick foundation makes a small greenhouse feel more permanent in the garden. It lifts the structure off the ground, protects the wood frame, and creates a clean edge that ties into paths and beds without much extra work.
This approach suits older gardens or formal layouts where you want the greenhouse to look like it belongs rather than sitting on top of the soil. Keep the brick height modest so it does not block light to the lower plants, and match the material to any existing walls or edging you already have.
Build A Greenhouse Right Next To Your Raised Beds

Many gardeners like keeping the greenhouse close to their main beds so they can move plants in and out without extra steps. It makes daily tasks simpler and helps you stay on top of watering and ventilation.
This layout works best in smaller yards where every foot of space counts. Keep a clear path between the two areas and choose a surface that stays usable in wet weather.
Building A Greenhouse With A Stone Base

A stone base gives a greenhouse more weight and a settled look that blends into the garden instead of sitting on top of it. It also helps keep the structure level on ground that slopes a little, which is common in older yards.
This approach works well if you already have stone walls or paths nearby. Start with a low wall of local stone or concrete blocks, then set the greenhouse frame on top. It adds cost up front but cuts down on future repairs from shifting soil.
Lay a Wooden Path Down the Center

A central wooden path keeps things practical inside a greenhouse where every bit of space counts. It gives you a solid place to walk without compacting soil or knocking over trays, and it makes it easier to reach plants on both sides during daily checks or watering.
This setup works best in narrow or rectangular greenhouses built on a budget. Use basic planks or reclaimed boards, and keep the path just wide enough for a wheelbarrow if you need to haul soil or supplies regularly.
Add A Greenhouse Right In The Garden

Placing a greenhouse in the middle of the garden makes it much easier to move plants back and forth as the weather changes. You can start seeds inside, harden them off just outside the door, and keep the whole process in one spot instead of hauling trays across the yard.
This setup works well for anyone with limited space or a busy schedule. Keep a few pots and a simple planting chart nearby so you can check dates without going back inside the house.
Raised Beds With Stone Bases

Raised beds built from reclaimed wood and held in place by stone walls make a greenhouse garden more practical. The wood gives you clean edges and deep soil while the stone keeps everything stable on uneven ground.
This approach works well for sloped sites or small plots because it creates flat growing areas without major excavation. Use pressure-treated or salvaged lumber for the boxes and stack local stone for the base so the whole thing stays budget-friendly and lasts for years.
Add a Cold Frame for Early Crops

A basic cold frame gives you a simple way to start seedlings before the main growing season. The low wooden frame with a slanted glass lid protects plants from late frosts while still letting in plenty of light.
This setup works best along a garden path where you can reach the plants without stepping into the beds. Use scrap wood and old window glass to keep costs low, and make sure the back edge sits a bit higher so rain runs off easily.
Add Stone Seating Next To Your Greenhouse

A stone bench built right beside the greenhouse gives you a place to rest while you work with plants. It turns the area into more than just a growing space and makes the whole setup feel like part of the garden instead of a separate structure.
This works well in smaller yards where you want both function and a spot to sit. Use local stone or salvaged blocks for the bench so it matches the greenhouse frame and holds up through the seasons. Keep the gravel base simple and let the plants spill around the edges.
Plan Crops With a Simple Planting Grid

A planting grid makes it easier to keep track of what you are growing and where each crop should go. It turns a small greenhouse setup into something more organized without adding much cost or work. Many people find they waste less space and remember their rotation plans better when the grid stays in view.
Place the grid on a board or clipboard near the greenhouse door or along the main bed. It works especially well in modest backyards where every row counts. Just update it each season and you will avoid crowding or repeating the same plants in the same spot year after year.
Install A Greenhouse Cabinet On An Exterior Wall
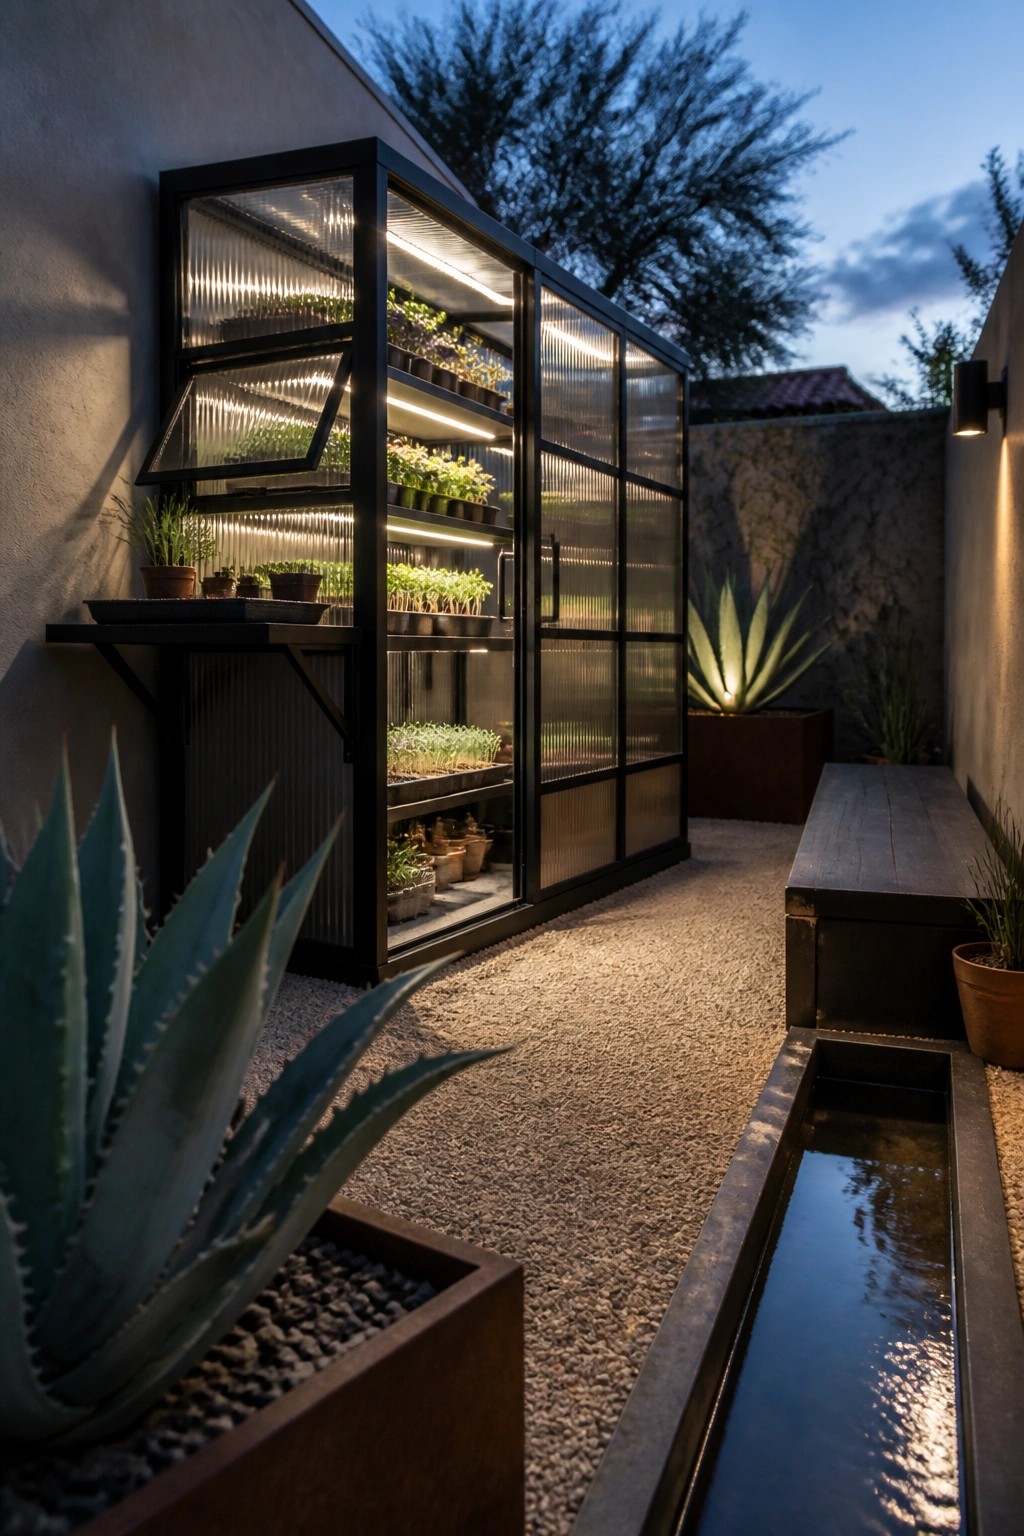
A greenhouse cabinet mounted on an outside wall gives you a compact way to grow seedlings or keep plants going through cooler months. It uses the house for support and shelter, so you avoid the cost of a full standalone structure while still getting good light and protection.
This approach works best along a south or west facing wall with some room for a path in front. Add interior lights on a timer and keep the shelves organized by plant size so everything stays easy to reach and water.
Bamboo Greenhouse Frames Keep Costs Low

Bamboo works well for a small greenhouse because it is light, easy to cut, and cheap to find. The frame in the photo shows how simple poles can hold plastic sheeting in place without needing fancy hardware or heavy lumber.
This approach suits small gardens or first-time builders who want something they can put up in a weekend. Just make sure the joints are tied or screwed tight and the plastic is secured well so wind does not pull it loose.
A Slanted Lid Greenhouse For Small Spaces

A wooden box with a slanted glass top gives you a simple greenhouse that fits where full size structures cannot. The angle catches light well and lets water run off, which helps keep the inside from getting too damp.
Place it on a balcony or small deck where you have room for just one or two large pots. It works best for apartments or homes with no yard, and you can start seedlings or grow herbs without spending much on materials.
Frequently Asked Questions
Q: How do I pick the right plan if my yard gets a lot of shade? A: Look for designs with clear plastic covers that let in more light. Place the greenhouse where it gets morning sun if possible. That helps plants grow strong without extra lights.
Q: Can I really build one using only stuff from around the house? A: Yes, many plans show how to reuse old windows or pallets. Start with a simple frame from scrap wood. It keeps costs near zero while still working well.
Q: What if wind is strong in my area? A: Anchor the base with stakes or concrete blocks. But choose a lower profile design to reduce wind catch. Check the plans for bracing tips that add strength.