
I’ve tinkered with vegetable garden layouts for years now, and the ones that deliver steady harvests always start with smart paths and bed shapes that respect how plants grow and spread.
Well-planned rows or blocks make crop rotation straightforward, keeping soil healthy without constant rethinking.
In my backyard, I finally ditched straight lines for a U-shaped setup that hugs the fence, pulling in more sun and cutting walking time in half.
Edging with simple stones holds everything in place as weeds push back over time.
A few of these approaches are the kind you sketch on paper first, then test in your own dirt for seasons to come.
Raised Beds in Straight Rows

One straightforward way to organize a vegetable garden is lining up raised beds in neat rows, like these wooden ones separated by gravel paths. The paths give you room to walk right up to the plants for weeding or picking without compacting the soil. It keeps everything tidy and makes harvesting a lot easier, especially with greens like pak choi and tatsoi that need regular attention.
This layout fits nicely in average backyards where space is tight. Build the beds about 3 feet wide so you can reach across from either side, and keep paths 18 inches or so for comfortable access. Gravel drains fast after rain… just watch that it doesn’t wash away, and top it up now and then.
Winding Path Through Raised Veggie Beds

This garden layout curves raised beds around a simple flagstone path. The dry-stacked stone walls keep soil in place and give a sturdy, natural edge. It puts plants like lettuce and tomatoes right where you can reach them easily. That wheelbarrow parked in the middle works great for tools or harvest.
Set this up in a sunny backyard corner. It fits small yards well since the path doesn’t eat up space. Stack stones you find locally, fill beds with good soil, and plant in groups. Watch drainage though. Wet roots lead to trouble.
Terraced Raised Beds for Sloped Yards

Slopes often go to waste in backyards, but terracing them with raised beds makes a perfect vegetable garden. These log-walled tiers hold potatoes, beans, and greens right where you can tend them without bending over much. The steps between levels keep it all practical and let you move easily from one planting zone to the next.
This setup works best on any hillside property, even steeper ones. Start with rot-resistant logs or stone for the walls, fill with good soil, and plant densely for bigger harvests. Watch drainage so water doesn’t pool. It’s a simple way to boost food growing without flattening the land.
Vertical Vegetable Garden Using Wall Space

One smart way to grow more veggies without taking up yard space is hanging terracotta pots right on an exterior wall. You see herbs like basil and parsley tucked into pots on simple metal brackets, plus cherry tomatoes dangling down. A string of lights adds evening usability, and those wheeled pallet planters at the bottom keep root veggies handy. It turns a plain wall into productive growing area.
This works best in tight spots like side yards or patios next to the house. Pick pots that match your wall color so they blend in. Mount them at eye level for easy picking, and group similar plants together. Watch for weight on the brackets, especially with watered pots. Suits renters too, since it’s less permanent than built-ins.
Raised Beds with a Central Walkway

One smart way to set up a vegetable garden is to line up raised beds along both sides of a walkway. You can reach every plant without stepping into the soil or straining over edges. In this rooftop setup, beds hold greens like lettuce and kale, plus climbing beans on a trellis. It keeps things neat and makes harvesting quicker.
This layout works best on decks, balconies, or rooftops where space is tight. Build beds from cedar or similar rot-resistant wood, keeping them about three feet wide for easy reach. Just check your structure can handle the weight, especially up high. Add pots at the ends for extra herbs if you want.
Log Edging for Raised Vegetable Beds

One straightforward way to organize a vegetable garden is to use split logs for the borders of raised beds. You see the logs laid horizontally along the edges here, creating neat rows with a narrow dirt path right down the middle. This keeps the soil in place, makes it simple to walk through without compacting the ground, and gives everything a rustic feel that fits right into a backyard setting.
It’s especially handy for smaller gardens where you want good access for weeding and picking. Stack the logs a couple high on level ground, fill with good soil, and plant right up to the edges. A water barrel nearby like the one shown saves steps too. Just make sure the logs are untreated to avoid chemicals leaching into your veggies.
Garden Arbor with Built-In Benches

This setup uses a simple metal arbor wrapped in climbing vines to frame a pair of wooden benches right into the structure. It makes a natural spot to sit in the garden without taking up extra space. The vines provide some shade and greenery overhead, turning what could be just a walkway into a real resting area where you can watch your plants grow or pick a quick snack.
Put this along a fence or garden edge where you want vertical growing room for beans, peas, or grapes. The benches work best on a deck or level ground, and they suit small backyards that need multi-use spots. Just make sure the arbor is sturdy enough for the plant weight, and keep the wood sealed against weather.
Hoop Houses Flanking Raised Beds

This setup puts two simple hoop houses right along a narrow central path, with raised beds tucked in close. It keeps everything handy for watering and picking, like that classic metal watering can hung on a post. The greenhouses shield tender plants from weather while the beds handle hardier crops. Good airflow down the path cuts disease risks, and labels on stakes make it easy to track what’s growing where.
Try this in a smaller backyard where space is tight. Line up the hoop houses to match your bed lengths, then mulch the path for less weeding. It works great for cool climates to stretch harvests into fall… just anchor those plastic covers well against wind. Suits beginners who want organized rows without big infrastructure.
Winding Mosaic Tile Path
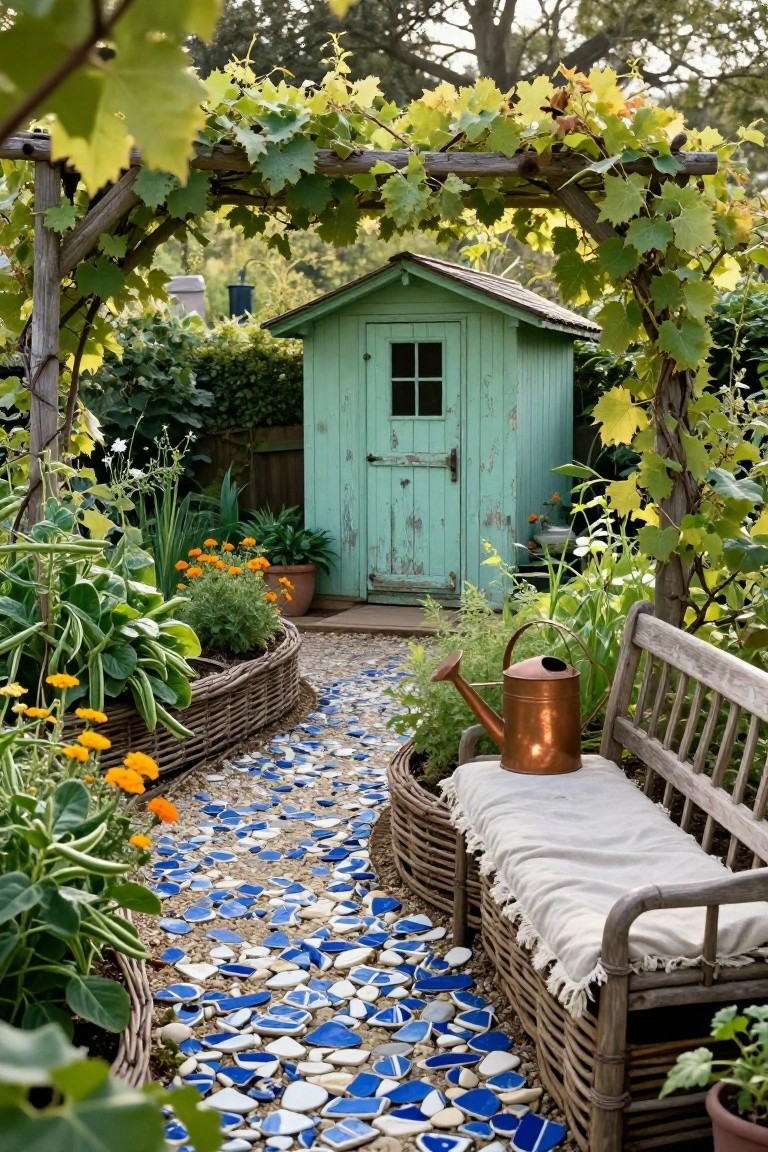
A gravel path inlaid with blue and white tile shards winds gently through raised vegetable beds toward a little green shed. It keeps things practical for daily visits while giving the garden a handmade charm that draws the eye without fuss. Folks like it because it separates walking space from plants neatly, and those recycled tiles add color that pops against the greens.
Lay down gravel first, then press in broken china or tiles for grip and looks. Edge beds with woven baskets or hurdles to hold soil back. This setup fits cozy yards best, especially where you want easy access to crops like beans and marigolds. Just watch for loose pieces if kids play nearby.
Patio Ledge Planters for Easy Harvests

One smart way to fit a garden into a tight spot is using a built-in ledge like this one along a sunny wall. Here, long terracotta troughs hold rosemary and other herbs right at picking height. Paired with olive trees in matching pots below, it keeps things tidy and productive without taking floor space.
This setup works great on patios or terraces near the kitchen door. Pick troughs that match your wall tiles for a clean look, and group heat-loving herbs together. Just make sure the ledge gets good sun and drainage so roots don’t sit wet. It’s low fuss for steady clippings all season.
Linear Row of Pots for Veggies

A straight lineup of terracotta pots holds young lettuce and kale plants right along a gravel path, tucked next to a simple stone bench. This keeps the garden contained and organized, so you can walk right up to pick what you need. The grasses behind add some height without crowding things out.
Try this in narrow side yards or along fences where space is tight. Pick pots all the same size for that clean look, and rotate crops to keep soil healthy. It suits sunny spots… just watch for good drainage to avoid root rot.
Raised Bed Layout in a Greenhouse
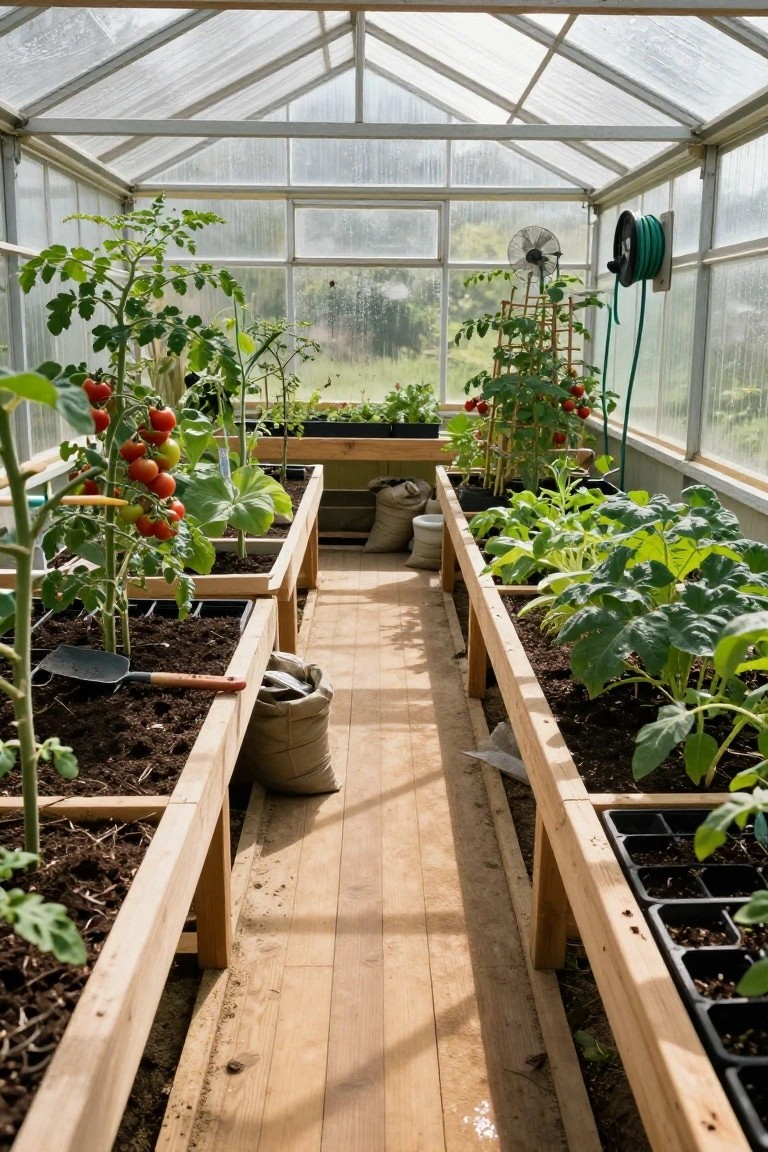
One smart way to grow veggies is lining up raised wooden beds down the middle of a greenhouse. With tomatoes hanging heavy on the vines and greens tucked in between, you get everything right at hand. The central walkway keeps it simple to move around, water, and pick without a lot of stooping.
This works best if you have limited space or want to stretch the season. Use untreated lumber for the beds, keep them about waist high, and leave room for that path. It suits most backyards and gives steady harvests from spring right into fall.
Central Pathway in Raised Vegetable Beds
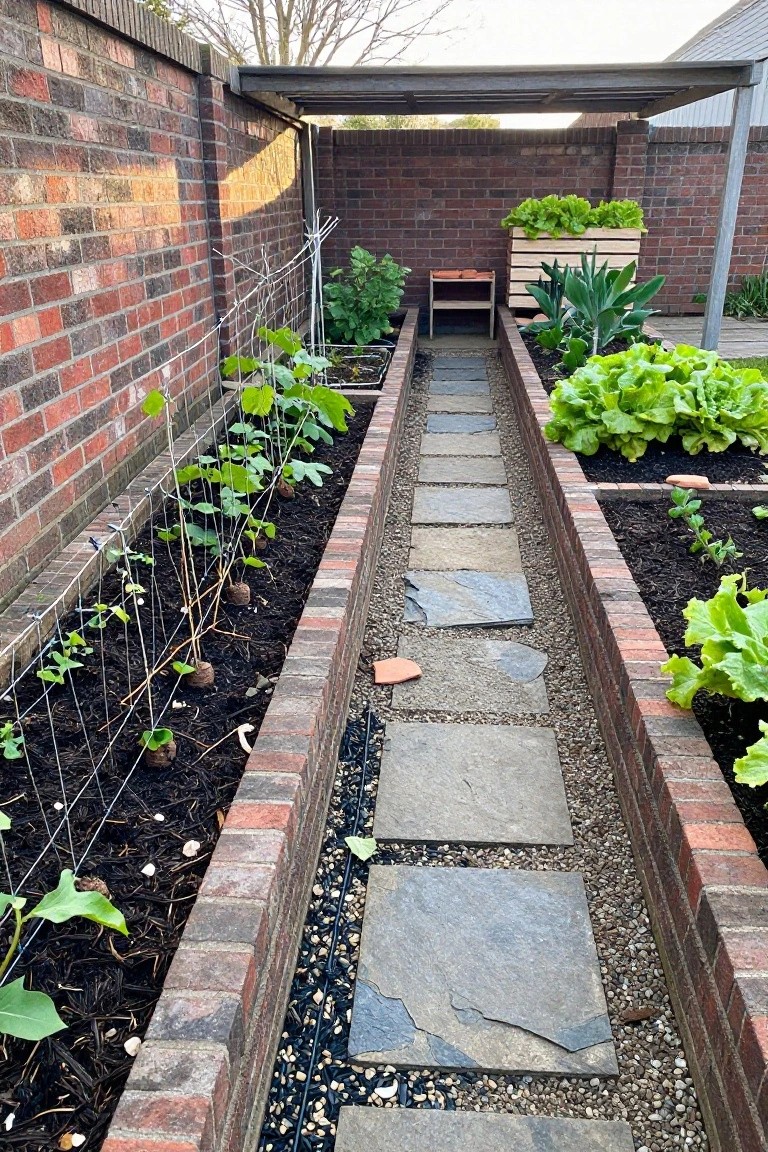
A simple stone pathway runs right down the middle of these brick raised beds. It gives you easy access to plants on both sides without compacting the soil or getting muddy. Climbing beans on trellises line one side, while lettuce and other greens fill the other. Keeps the garden feeling organized and practical.
This layout works best in narrow spaces like along a fence or wall. Build the beds about knee-high with bricks for good drainage, then lay flat stones or gravel for the path. Just make sure the path stays level so wheelbarrows roll smooth. Perfect for steady harvests without much fuss.
Courtyard Raised Beds for Vegetable Gardens

Raised beds made from local stone turn a simple walled courtyard into a productive veggie patch. Tomatoes climb tall along one side, peppers hang from pots nearby, and basil fills in the gaps. The low gravel path between beds lets you reach every plant without stepping in the dirt, and tiled edges keep soil from spilling over.
This layout fits tight spaces like urban backyards or sunny patios near the kitchen door. Stack the beds to waist height so you bend less at harvest time. Add a reed shade sail overhead for hot climates… just watch for good drainage in those stone walls.
Raised Beds Flanking a Central Path

One straightforward way to organize a vegetable garden is lining up raised wooden beds on both sides of a simple gravel path. It keeps everything tidy and lets you walk right up to plants for weeding or picking without compacting the soil. That central path here leads straight to a brick fire pit, which doubles as a gathering spot once the harvest is in.
This layout shines in average backyards where space is tight but sun is good. Build beds about knee-high with untreated timber to avoid chemicals leaching into food. Gravel drains fast after rain… just watch for weeds pushing through, so a weed barrier underneath helps. Works for beginners too, since it naturally zones crops like brassicas and greens.
Straw Bale Edging for Raised Vegetable Beds

One straightforward way to organize a vegetable garden is edging raised beds with straw bales. They hold back the soil nicely and give a bit of extra insulation for roots, especially come winter. In this setup, the bales pair with stacked logs for sturdy borders around plots of cabbage and other greens, keeping everything tidy and frost-protected under a simple plastic cover.
This works best in smaller backyards where you want low-cost beds that break down over time. Stack bales two high along the edges, fill with good soil, and add logs if you need more height or drainage. It suits practical growers in cooler spots. Just refresh the bales each season to avoid rot.
Frequently Asked Questions
Q: Can I squeeze these layouts into a small patio space?
A: Pick the vertical or square-foot ideas from the article. They stack plants high or pack them tight without crowding. Start with just four to six squares to test what grows best there.
Q: How do I rotate crops so my garden stays healthy year after year?
A: Group plants by family in your layout, like all tomatoes and peppers together. Next season, swap those spots with beans or greens from a different family. This simple shift starves pests and rebuilds soil naturally.
Q: What if I want to mix flowers in with my veggies?
A: Plant marigolds or nasturtiums right alongside tomatoes and brassicas. They chase off bugs while adding color. Keep them on the edges so veggies get the prime sun.
Q: Do these layouts work for beginners with no experience?
A: Grab the keyhole or row layouts first. They guide you step by step and forgive small mistakes. You’ll harvest plenty by midsummer.