

Ever wondered how you can easily grow your own fresh and nutritious broccoli sprouts right in your kitchen? Picture this: you’re craving a healthy addition to your meals, but the store-bought options just don’t cut it. What if you could harvest your own superfood at home? In this article, you’ll discover a simple and cost-effective way to cultivate vibrant broccoli sprouts in a humble mason jar.
By learning the art of growing broccoli sprouts in a mason jar, you’re not only embracing a fun and rewarding DIY project but also unlocking a powerhouse of health benefits. Imagine elevating your dishes with homegrown goodness, packed with essential nutrients and a burst of flavor. Get ready to embark on a journey of freshness and sustainability as you delve into the art of cultivating these tiny yet mighty greens.
Selecting the Right Supplies
When it comes to growing broccoli sprouts in a mason jar, selecting the right supplies is crucial for a successful harvest.
Here’s what you’ll need:
- Broccoli Sprout Seeds: Ensure you have high-quality seeds specifically meant for sprouting.
- Wide-Mouth Mason Jar: Opt for a jar that allows proper ventilation to prevent mold growth.
- Sprouting Lid or Cheesecloth: Choose a lid that can drain water easily while keeping the seeds intact.
- Filtered Water: It’s essential to use clean, filtered water for sprouting.
- Dark and Warm Location: Find a spot with indirect sunlight to facilitate the sprouting process.
Remember, having the correct supplies sets the foundation for healthy and vibrant broccoli sprouts.
Recommended Products

🥗EASY & HEALTHY SPROUTING AT HOME - Our sprouting kits make it easy to grow a variety of nutritious sprouts at home. Healthy and delicious ingredients for your sandwiches, salads, and soups! Growing sprouts is not only a fun process, but it's also a cheap way to get fresh sprouts! For $29.99 you can have a whole year's worth of sprouts. or even 3 years, 5 years, 10 years.

GROW FRESH SPROUTS AT HOME: Grow crisp broccoli and alfalfa sprouts in just days with a simple jar system designed for easy rinsing, draining, and dependable results.

All-in-One Convenient Design: The sprouting jar lid's innovative two-in-one structure allows it to double as a sturdy stand—no extra parts needed. This integrated sprouting lid fits securely on 3.74-inch wide-mouth Mason jars, guaranteeing leak-free sprouting
Preparing the Mason Jar
To get started on growing broccoli sprouts in a mason jar, follow these simple steps:
- Clean the Mason Jar: Wash the mason jar thoroughly with soap and hot water before beginning.
- Sterilize the Jar: To prevent mold growth, sterilize the jar by boiling it in water for a few minutes and letting it dry completely.
- Prepare the Sprouting Lid: Ensure the sprouting lid is clean and ready to use for proper ventilation and drainage.
- Add Broccoli Sprout Seeds: Place a small amount of broccoli sprout seeds (usually about a tablespoon) into the jar.
- Rinse and Drain: Fill the jar with filtered water, swirl the seeds around, and then drain the water using the sprouting lid.
- Store in a Warm, Dark Place: Keep the jar away from direct sunlight in a warm location to encourage sprouting.
Remember, proper preparation of the mason jar sets the foundation for successful broccoli sprout growth.
Germinating the Broccoli Seeds
Let’s dive into the exciting part – germinating the broccoli seeds. Here’s how to do it:
- Soak: Begin by soaking about 1 to 2 tablespoons of broccoli sprout seeds in water for 8 to 12 hours.
- Rinse: After soaking, rinse the seeds thoroughly under cool water to clean off any residue.
- Drain: Ensure all excess water is drained from the seeds before moving on to the next step.
- Spread: Spread the damp seeds evenly in a single layer across the sprouting lid of your mason jar.
- Rinse and Drain: Continue the process of rinsing and draining the seeds twice a day to keep them moist but not waterlogged.
- Patience: Within a few days, you’ll start to see tiny sprouts emerging from the seeds.
- Light: Once the sprouts appear, move the jar to indirect sunlight to allow photosynthesis to occur.
Rinsing and Draining
To ensure successful broccoli sprout growth in your mason jar, the rinsing and drainage steps are crucial. Here’s what to do:
- Rinse the broccoli seeds twice a day by filling the jar with water, swirling the seeds, and then draining it out.
- After rinsing, tilt the jar upside down at a slight angle to allow excess water to drain out completely.
- Ensure proper drainage to prevent mold growth and maintain optimal moisture levels for sprouting.
Consistent rinsing and draining foster a healthy environment for your broccoli sprouts to flourish.
Recommended Products

WHAT WILL YOU GET? - The package include 3 packs Sprouting Stands. Stands are made of high quality PP, and unique water tray design can collect the water when jar is poured.

【Universal Sprouting Kit】 Includes 2 sprouting trays, 2 Pcs sprouting stands. The unique design of the sprouting stand can be rotated 360 degrees to ensure the most suitable inclination angle of the sprouting jar

【WHAT YOU GET】This complete Boombamo sprouting jar kit comes with everything you need for effortless home sprouting, including 2 pieces of 32oz mason jars, 2 screen sprout lids, 2 blackout sleeves, 1 sprouting stand, and 1 drip tray. This all-in-one sprouting kit covers all essential accessories for growing a wide variety of fresh sprouts at home. No complicated tools or tricky operations are required, allowing you to harvest crisp, homemade sprouts with ease.
Harvesting Your Broccoli Sprouts
Congratulations on successfully growing your broccoli sprouts! It’s time to enjoy the fruits of your labor. Here are some tips for harvesting your broccoli sprouts:
- Harvest time: Generally, broccoli sprouts are ready to harvest after about 5-7 days of growth.
- Appearance: Look for tiny green leaves and stems – a sign that your sprouts are ready to be enjoyed.
- Harvest method: You can use clean scissors to cut the sprouts just above the seeds.
- Enjoying your harvest: Fresh broccoli sprouts can be added to salads, sandwiches, smoothies, or used as a garnish for various dishes.
Recommended Products
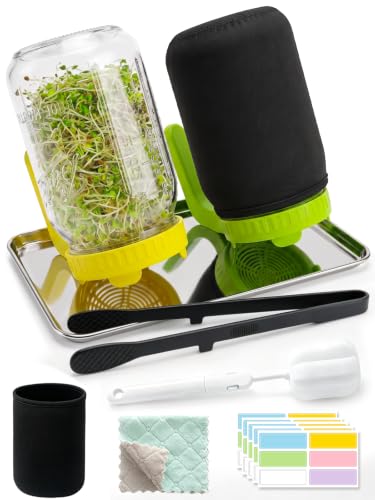
All-in-One Complete Sprouting Jar Kit This full microgreen growing set includes 2 Wide-Mouth Mason Jars with Sprout Lids,304 Stainless Steel Drain Tray,Blackout Sleeves,Silicone Tongs,Cleaning Brush,silicone harvesting tongs,a dedicated cleaning brush and colorful waterproof labels.The waterproof labels help you record seed types and sprouting dates for easy distinction.All supplies you need for home germination are covered.(Seeds are not included)

Complete Broccoli Sprout Growing Kit: This all-in-one sprouting kit includes 2 wide-mouth quart mason jars, 2 premium 304 stainless steel mesh lids, 2 blackout sleeves, 2 adjustable metal stands, 1 water drip tray, and 1 cleaning brush. No extra parts required — start growing fresh broccoli sprouts, alfalfa, mung beans, and other microgreens right on your kitchen countertop in just 3-5 days.

COMPLETE SPROUTER SET - Just add your own seeds to grow fresh & delicious sprouts at home. Includes 2 glass jars, 2 sprouting lids, stainless steel stand, drip tray, 2 blackout sleeves
Conclusion
You’ve now learned the essential steps to successfully grow broccoli sprouts in a mason jar. By diligently rinsing and draining your seeds, you’re creating the perfect environment for your sprouts to thrive. Remember to maintain proper moisture levels and prevent mold by ensuring adequate drainage. With just a little care and attention, you’ll soon be enjoying fresh broccoli sprouts in your favorite dishes. Happy sprouting!
Frequently Asked Questions
Q: How often should I rinse the broccoli seeds when germinating them in a mason jar?
A: Rinse the broccoli seeds twice a day for optimal sprout growth.
Q: How can I drain excess water when germinating broccoli seeds in a mason jar?
A: Tilt the mason jar to drain excess water after rinsing.
Q: What is the importance of ensuring proper drainage when germinating broccoli seeds?
A: Proper drainage is crucial to prevent mold and maintain optimal moisture levels for sprout growth.
Q: How long does it take for broccoli sprouts to be ready for harvesting?
A: Broccoli sprouts are ready for harvesting in about 5-7 days when tiny green leaves and stems appear.
Q: How should I harvest broccoli sprouts for consumption?
A: Harvest broccoli sprouts with clean scissors just above the seeds for freshness. Enjoy them in salads, sandwiches, or smoothies.
